| |
The source code of all examples is included in the JDroidLib distribution.
Developing professional Apps with minimum effort
As for desktop applications the design and logic of the user interface is crucial for almost any application. For smartphones the user interface is limited by the fact that only one window is visible at a given moment. Therefore switching from one activity window to another is frequent and the application logic becomes complex because each window owns the application thread (is modal). We recommand to design the app with only one or a few windows (activities) that combines most of the controls: Text that remains fixed (like titles) or that changes (like status information), buttons and other widgets (like a progress bar) and graphics elements (like a diagram). It is easy to use the GameGrid window for such a combined scene and to create the screen elements as instances of the class Actor.
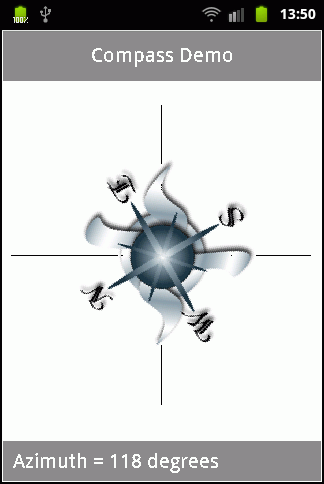
The following example shows the principle of a compass application. This is not inventive as such because you find many compass apps in the Android market. But the code presented here is simple enough to be understood by Java beginners. It shows clearly the JDroidLib is more than a framework for creating games and reduces the complexity an order of magnitude compared to plain Android API programming.
package ch.aplu.compass;
import ch.aplu.android.*;
import android.graphics.*;
public class Compass extends GameGrid
implements GGComboSensorListener
{
private final String title = "Compass Demo";
private final int titleHeight = 50;
private final int statusHeight = 40;
private GGTextField tfTitle;
private GGTextField tfStatus;
private int screenWidth;
private int screenHeight;
private int xCenter;
private int yCenter;
private Actor compass;
private Bitmap compassSeed;
public Compass()
{
super(WHITE, windowZoom(400));
}
public void main()
{
screenWidth = getNbHorzCells();
screenHeight = getNbVertCells();
xCenter = screenWidth / 2;
yCenter = screenHeight / 2;
initDisplay();
compassSeed = new Actor("compass").getImage();
GGComboSensor sensor = GGComboSensor.init(this);
sensor.addComboSensorListener(this);
}
private void initDisplay()
{
GGBackground bg = getBg();
bg.clear(Color.WHITE);
bg.setPaintColor(Color.GRAY);
bg.fillRectangle(new Point(1, 1),
new Point(screenWidth - 1, titleHeight));
bg.fillRectangle(new Point(1, screenHeight - statusHeight),
new Point(screenWidth - 1, screenHeight - 1));
bg.setPaintColor(Color.WHITE);
tfTitle = new GGTextField(title, new Location(0, 0), false);
int w = tfTitle.getTextWidth();
tfTitle.setLocation(new Location(
(screenWidth - w) / 2, titleHeight / 2));
tfTitle.show();
tfStatus =
new GGTextField(new Location(10,
screenHeight - statusHeight / 2), false);
tfStatus.show();
bg.setPaintColor(Color.BLACK);
int r = 150;
bg.drawLine(new Point(xCenter, yCenter - r),
new Point(xCenter, yCenter + r));
bg.drawLine(new Point(xCenter - r, yCenter),
new Point(xCenter + r, yCenter));
refresh();
}
private void showStatus(String text)
{
tfStatus.setText(text);
}
public void orientationChanged(float[] values)
{
int azimuth = (int)values[3];
showStatus("Azimuth = " + azimuth + " degrees");
if (compass != null)
compass.removeSelf();
compass =
new Actor(GGBitmap.getRotatedImage(
compassSeed, -azimuth));
addActor(compass, new Location(xCenter, yCenter));
}
public void accelerationChanged(float[] values)
{
}
public void magneticFieldChanged(float[] values)
{
}
}
|
Remarks:
- The constructor used here creates a full-screen window with a white background with virtual window size 600
- We fix the screen to the current orientation at startup (default for setScreenOrientation())
- Most initialization is performed in main() (and not in the instance variable declaration section)
- We optain the compass (seed) image by instantiating a (non-rotatable) actor and calling getImage()
- This image will be rotated on-the-fly by calling GGBitmap.getRotatedImage()
- GGComboSensor.init() creates a singleton sensor. This is an abstraction of the internal combo sensor that measures orientation (azimuth, pitch, roll), acceleration (ax, ay, az) and magnetic field (Bx, By, Bz)
- The application implements a GGComboSensorListener and registers it with addComboSensorListener(). This enables the orientationChange() callback that is invoked by the system whenever the sensor orientation values change
- The GGTextField class is used to display text that change during run-time
- Whenever orientationChanged() is triggered, we read the current azimuth and uses it to rotate and display the compass image. values[3] is the azimuth adapted to the current device orientation (the compass line is from bottom to top with respect to the window)
Download Android app for installation on a smartphone or emulator.
Download sources (Compass.zip).
Create QR code to download Android app to your smartphone.
Install/Start app on a USB connected smartphone or a running emulator.
(This is a WebStart signed by the University of Berne, Switzerland. It installs some helper files in <userhome>.jdroidtools.If you did not install the Android SDK, you may install a slim version of the Android-Emulator in <userhome>.jdroidemul using this link, To start the emulator, execute ExecEmul.jar found in <userhome>.jdroidemul)
Download app via Bluetooth using DroidInstall app.
(This is a WebStart signed by the University of Berne, Switzerland. It starts a Java Bluetooth client application ApkBlueInstaller that connects to a Android Bluetooth server DroidInstall that must be started on the smartphone. Click here to get the DroidInstall app.)
| |
 |
Using the same concept we developed within an hour or so an app that turns on and off two servers remotely by sending a short SMS message to a commercial SMS power-line switch. The buttons are instances of the GGPushButton class.
| |

