|
The source code of all examples can be downloaded from a link in the right side bar.
This chapter presents a classical systematic introduction to the most important programming concepts using the micro:bit with no additional hardware. No prior knowledge of computing is assumed.
The following themes are presented in the following order based on many year's experience in introductionary programming courses:
- Sequence
- Modularity
- Iteration: Repeat/For
- Variables
- Iteration: While
- Selection
- Events
The order is determined by a gently increasing complexity with a complete understanding at all stages.
1. Sequence
In the most simple scenario a program consists of writing commands to make a computer perform some well-defined activities. Like a cooking recipe the actions are executed one after the other in a timed sequence.
- do this
- then do that
- then do that
- then ...
The computer and its programming language is like a cook that speaks and understands a certain conversational language. The program must obey some strict syntax rules and use some predefined words also called keywords. Additional commands like writing to the dot matrix display can be activated by importing a specific programming module, here a module called microbit.
The led arrangement is considered as an object named display that "knows" some useful operations. A dot separator is used to invoke operations that belong to this object. Operations are also called functions and must have a parameter parenthesis pair that may contain values passed to the function. Even when no values are passed, an empty parameter parenthesis pair must be added to the function name.
In the following example, 4 images are displayed one after the other, each during 1 second (1000 Milliseconds). They correspond to the 4 cardinal directions and are part of the Image class, so they are addressed using the dot separator by Image.ARROW_N for the north direction, Image.ARROW_E for the east direction, Image.ARROW_S for the south direction and Image.ARROW_W for the west direction. The sleep() function halts the program execution for the specified time (in ms). The Image class may be considered as a container holding the images.
With this basic knowledge we write the first program line-by-line in TigerJython's program editor (a command is also called a statement).
from microbit import *

display.show(Image.ARROW_N)
sleep(1000)
display.show(Image.ARROW_E)
sleep(1000)
display.show(Image.ARROW_S)
sleep(1000)
display.show(Image.ARROW_W)
sleep(1000)
|
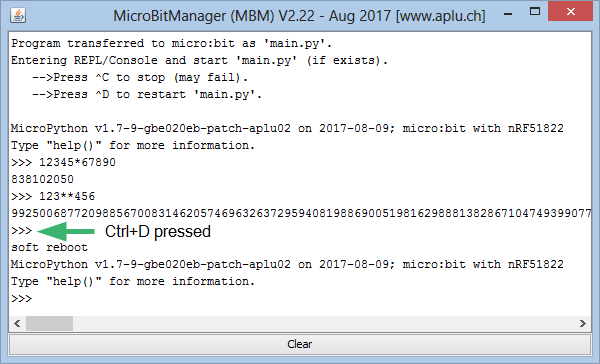
Attach the micro:bit via the USB cable to your computer and press the black-bordered button in the tool bar. A terminal window is opened and the program executes gently. When the program execution terminates, the Python prompt >>> is displayed and you may enter Python commands interactively, e.g. calculations using the +, -, * and / for arithmetic operations and ** for exponentiation (the result of 123 to the 456 is a number with 953 digits). These commands are executed immediatly without writing a program. That's the reason Python is also called an interpreted programming language or short an interpreter.

When Ctrl+D is pressed, the program is started again. If you want to execute the next program or a modified version of your program, there is no need to close the window. It will close and reopen automatically at the next download/execute.
Programming errors are frequent, even for professional programmers, so never resign. When you press the download button, some errors are already detected by TigerJython's sophisticated error tracker that prevents the program to be downloaded. This happens for example when you misspell the word from:

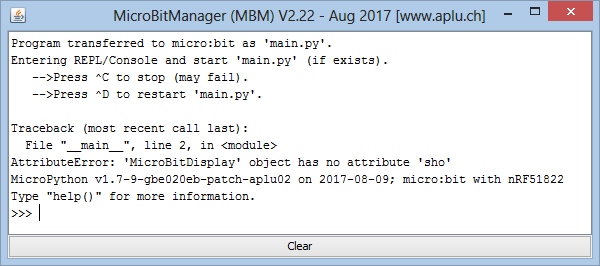
Other errors are only detected at runtime, for instance if you misspell show:

But in both cases the precise error reports are of great help for you and you quickly make the correction in the editor and press the download button again. The open terminal window closes and reopens automatically.
2. Modularity
One of the most important programming concept is modularity, also called the principle of structured programming. The principle is simple: you summarize a group of statements by defining your own function. In other words, you apply a well-chosen name to a bunch of statements. The name should express the function's main purpose. It can easily comprise several words joined together with no spaces in the so called "camel case notation" (beginning with a lowercase letter, but with every first letter of other words capitalized).
Since all 4 compass directions are displayed one after the other, here you name the function showCompassDirection. The function definition is always positionend in the upper part of your program. It starts with the keyword def followed by the funcition name and a round parenthesis pair. Do not forget the ending colon in the def line. In the following code block, you must indent all statements to the same level, normally 8 spaces (press the TAB key to make a quick indentation). In the function definition, a parameter parenthesis is always required even if you don't need parameters. In this case an empty parenthesis pair is used.
Once you have defined your function, you can use it like any other predefined function just by writing down the function name with the parameter parenthesis. We say that at this time the function is "invoked" or "called". Do not confuse the function definition and the function call! The function definition is not code that executes where it stands, the code only executes when the function is invoked.
from microbit import *

def showCompassDirections():
    display.show(Image.ARROW_N)
    sleep(1000)
    display.show(Image.ARROW_E)
    sleep(1000)
    display.show(Image.ARROW_S)
    sleep(1000)
    display.show(Image.ARROW_W)
    sleep(1000)

showCompassDirections()
|
Even if at first glance modularity seems to cause more paper work, you will see that it helps you very much to structure the program, so makes it much more human readable.
By defining functions with parameters you can adapt the behavior of your function at runtime which makes it very versatile. In the following example the delay time is changed at every function call.
from microbit import *

def showCompassDirections(time):
    display.show(Image.ARROW_N)
    sleep(time)
    display.show(Image.ARROW_E)
    sleep(time)
    display.show(Image.ARROW_S)
    sleep(time)
    display.show(Image.ARROW_W)
    sleep(time)

showCompassDirections(2000)
showCompassDirections(200)
showCompassDirections(200)
|
Think about the ugly code, if you did not use functions: You would have to copy and paste three times almost the same code and your program would become a jungle. So keep in mind: Never copy&paste a code block, but define a function and call it several times.
3. Iteration: Repeat/For
The computer is often considered as a dull machine that performs essentially boring repetitive tasks (but with no fatigue and more precisely than a human). Even if this impression is a somewhat narrow view, repetitions (often called iterations) are an important programming structure. The most simple iteration is
repeat n-times:
do-something
In TigerJython you can use this syntax, e.g. in order to repeat the turning arrows 4 times you write:
from microbit import *

def showCompassDirections(time):
    display.show(Image.ARROW_N)
    sleep(time)
    display.show(Image.ARROW_E)
    sleep(time)
    display.show(Image.ARROW_S)
    sleep(time)
    display.show(Image.ARROW_W)
    sleep(time)

repeat 4:
    showCompassDirections(1000)
|
repeat is not a standard element of the Python language (nor of most other programming languages). If you do not have TigerJython, a so-called anonymous loop-variable is an elegant alternative:
from microbit import *

def showCompassDirections(time):
    display.show(Image.ARROW_N)
    sleep(time)
    display.show(Image.ARROW_E)
    sleep(time)
    display.show(Image.ARROW_S)
    sleep(time)
    display.show(Image.ARROW_W)
    sleep(time)

for _ in range(4):
    showCompassDirections(1000)
|
Such an iteration is also called a loop and the iterated code is the body of the iteration. The number of loop cycles is specified by the parameter value in the range() function.
4. Variables
A variable is a named container (you may think of a box or a drawer), where you can store a single value and manipulate it using the variable name. Whenever you write
greetings = "hello"
you create a container named greetings and put the word "hello" in it.. Such a statement is called an assignment.:
variable-name = variable-value
After assigning a value to the variable, you access the value using the variable name, e.g. you can write it out with print(greetings), but you can also change its value by reassigning a new value to it:
greetings = "good morning"
Since the value is some text, you have to quote it. A variable that hold a text is called a string.
greetings = "Hello"
print(greetings)
greetings = "Good morning"
print(greetings)
|
|
|
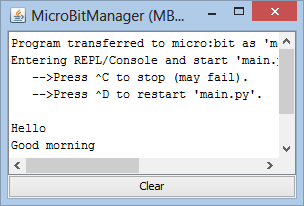
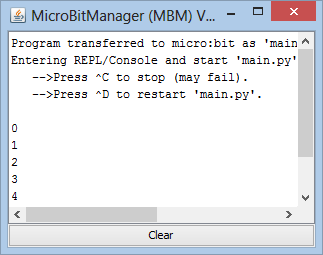
As you see the output of print appears in the terminal window. An import statement is unnecessary.
5. Iteration: While
While is another program structure to create loops. It implements the following common logic:
As long as some condition is true, repeat:
do-something
or short:
while condition is true:
do-something
The condition is also called running condition of the loop, since the body of the loop is repeated as long as the condition is true. You can also imagine that before the body of the loop executes, the conditions is checked. As soon as it becomes false, the while-structure is completely abandoned and the program continues with the statement just after the while-structure.
In the following example, the variable i is first initialized to zero. In the loop body, its value is incremented by 1 as long as it is smaller than 5. Then the running condition becomes false and the while-structure terminates. To see what happens, the value auf i is printed out.
i = 0
while i < 5:
    print(i)
    i = i + 1
|
|
|
The statement i = i + 1 needs some explication: It is clearly not a mathematical equation, but a short, and somewhat confusing syntax to perform the following:
- get the current value of i in a calculation buffer
- add 1
- store the result as a variable with the same name i
If the running condition never becomes false, the loop is never terminated. So it is easy to create an infinitely running loop that rotates the arrows, since True is always true.
from microbit import *

def showCompassDirections(time):
    display.show(Image.ARROW_N)
    sleep(time)
    display.show(Image.ARROW_E)
    sleep(time)
    display.show(Image.ARROW_S)
    sleep(time)
    display.show(Image.ARROW_W)
    sleep(time)

while True:
    showCompassDirections(200)
|
A program with an infinite loop ends only when you do something dramatic like removing the power of the micro:bit. Therefore in theoretical informatics it is considered to be a fatal programming error. With microcontrollers it is quite common to loop in a while-True structure, because it is possible to stop the execution of the current process by some external events, e.g. by pressing Ctrl+C in the terminal window.
6. Selection
Conditional execution of program blocks is very common: Some action should only be performed, if a certain condition is true. The basic logic the same as in everyday life.
if some condition is true:
do-if
do-that
do-if is only executed, if the condition is true. After finishing do-if, the statement do-that is executed. If the condition is false, only do-that is executed. There is a more general selection with a else-block:
if some condition is true:
do-if
else:
do-else
do-that
Again, do-if is executed, if the condition is true, but now if the condition is false, do-else is executed. After either of these executions, do-that is executed.
In the following example the accelerometer is used to determine if the micro:bit is tilt left or right down. A left or right arrow is then displayed.
from microbit import *

while True:
    acc = accelerometer.get_x()
    if acc > 0:
        display.show(Image.ARROW_E)
    else:
        display.show(Image.ARROW_W)
    sleep(100)
|
In a simpler situation, the else-block may be absent.
If the else-block starts with an if.statement like:
if some condition is true:
do-if
else:
if another condition is true:
...
it is common to use the keyword elif::
if some condition is true:
do-if
elif another condition is true:
...
In the following example the tilt arrows are shown only if the tilt angle is big enough, otherwise a small square is shown.
from microbit import *

while True:
    acc = accelerometer.get_x()
    if acc > 100:
        display.show(Image.ARROW_E)
    elif acc < -100:
        display.show(Image.ARROW_W)
    else:
        display.show(Image.SQUARE_SMALL)
    sleep(100)
|
The additional delay in the while-loop may be of great importance, first to reduce the reaction time of the system, and second to prevent overloading the CPU with a very fast repeating loop (also called a tight loop). Be aware of the following principle in microcontroller programs: Do never waste computer resources in a tight loop (thus give other tasks than yours the chance to run).
7. Events
The micro:bit was designed as a tiny processing unit for beginner's programming, so there was a decision taken by its developers, not to support event programming. For us this is a drawback, because we always teach event programming in beginner's courses, since it is a fundamental paradigm in almost all application programs. Event handling can be expressed verbally as follows:
whenever something happens:
do-this
In other words: When the event happens (is triggered), the running code is immediately interrupted (or as soon as interruption is secure) and the do-this block starts to execute. After completion, the code continues to run where it was interrupted. There is even a more sophisticated event handling scenario, where the currently running program continues to run, but the do-this code executes in parallel (technically spoken in a different "threads" that operates quasi-parallel).
The micro:bit uses event processing in one particular situation: When one of the buttons a or b is pressed, the current program is interrupted and an internal event flag is set that "remembers" the button-press event. This flag remains set until the function was_pressed() is called. At the next call of was_pressed() (that may happen much later), the state of the flag is returned (True or False). The function call also resets the flag, so a next button-press event can be detected. In the following program the direction arrows turns by 90 degrees steps, until the button a is pressed.
from microbit import *

def showCompassDirections(time):
    display.show(Image.ARROW_N)
    sleep(time)
    display.show(Image.ARROW_E)
    sleep(time)
    display.show(Image.ARROW_S)
    sleep(time)
    display.show(Image.ARROW_W)
    sleep(time)

while not button_a.was_pressed():
    showCompassDirections(1000)
display.show(Image.NO)
|
You may press and release the button any time during the execution of showCompressDirections() that lasts abount 4 s. At the end of a 360 degrees rotation, the call to button_a.was_pressed() returns True and the program terminates by showing the Image.NO picture (a cross).
Do not miss the parameter parenthesis in was_pressed(). This slip of the pen may cause you much trouble, because it is not detected by the system as syntax nor as runtime error. Instead the program behaves not as expected and shows the cross immediately. (This happens because was_pressed (without parenthesis) is a legal function name.) This kind of error is called a semantic error and those errors are often very hard to track down. In many other programming languages this same error is detected as a syntax error that is reported before the program executes. Those languages are considered to be more secure for mission critical applications than Python.
|
 LinkUp
 TCPCom


 Simulations


