|
Second example
Purpose:
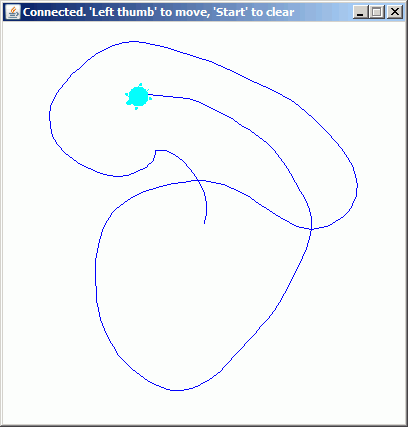
Use the Xbox360 controller to guide a turtle. The left thumb control selects
the turtle's direction and speed. The START button clears the turtle's
playground and sets the turtle at its home position.
The Java
turtle package ch.aplu.turtle is used (download jar,
doc).
// TurtleDemo.java
import ch.aplu.turtle.*;
import ch.aplu.xboxcontroller.*;
import java.awt.event.*;
public class TurtleDemo
{
private class MyXboxControllerAdapter extends XboxControllerAdapter
{
public void leftThumbMagnitude(double magnitude)
{
speed = (int)(100 * magnitude);
t.speed(speed);
}
public void leftThumbDirection(double direction)
{
t.heading(direction);
}
public void start(boolean pressed)
{
if (pressed)
{
t.clear();
t.home();
}
}
public void isConnected(boolean connected)
{
if (connected)
t.setTitle(connectInfo);
else
t.setTitle("Connection lost");
}
}
private final String
connectInfo = "Connected. 'Left thumb' to move, 'Start' to clear";
private Turtle t = new Turtle();
private volatile boolean isExiting = false;
private int speed = 0;
public TurtleDemo()
{
t.setTitle("Connecting...");
XboxController xc = new XboxController();
t.wrap();
if (!xc.isConnected())
t.setTitle("Xbox controller not connected");
else
t.setTitle(connectInfo);
xc.addXboxControllerListener(new MyXboxControllerAdapter());
xc.setLeftThumbDeadZone(0.2);
t.addWindowListener(new WindowAdapter()
{
public void windowClosing(WindowEvent e)
{
isExiting = true;
}
});
while (!isExiting)
{
if (speed > 10)
t.forward(10);
else
Turtle.sleep(10);
}
xc.release();
System.exit(0);
}
public static void main(String[] args)
{
new TurtleDemo();
}
}
Discussion: We
use our own XboxControllerAdapter class to implement the event
callbacks leftThumbMagnitude(), leftThumbDirection()
and start(). The
magnitude (knob distance from the center position) determines the turtle's
speed and the knob direction determines the turtle's heading. start()
is called when the START button is pressed and again when it is released.
The boolean parameter pressed let you distinguish the two cases.
Setting the control's dead zone to 0.2 using setLeftThumbDeadZone() makes
the knob insensitive in a 20 percent circular zone around the center position.
The magnitude value remains in the range of 0..1 outside the dead zone.
This will rule out mechanical inaccuracies around the center position.
A window listener
is used to terminate the application gracefully when clicking the title
bar's close button.

Execute TurtleDemo
using WebStart.
If the execution fails,
check the system requirements (see above)
Third
example
Purpose:
Use the Xbox360 controller to pilot a Lego NXT rover. The left and right
trigger control set the speed of the left and right motor respectively.
After the START button is pressed, the rover moves forward, after the
BACK button is pressed, it moves backward.
// NxtDemo.java
// Steer Lego NXT robot with Xbox Controller
// Uses NxtJLib and Bluecove package, see www.aplu.ch/nxtjlib
import ch.aplu.nxt.*;
import ch.aplu.xboxcontroller.*;
import javax.swing.JOptionPane;
public class NxtDemo
{
private class MyXboxControllerAdapter extends XboxControllerAdapter
{
public void start(boolean pressed)
{
advance = true;
}
public void back(boolean pressed)
{
advance = false;
}
public void leftTrigger(double value)
{
motA.setSpeed((int)(100 * value));
if (advance)
motA.forward();
else
motA.backward();
}
public void rightTrigger(double value)
{
motB.setSpeed((int)(100 * value));
if (advance)
motB.forward();
else
motB.backward();
}
}
private Motor motA = new Motor(MotorPort.A);
private Motor motB = new Motor(MotorPort.B);
private boolean advance = true;
public NxtDemo()
{
XboxController xp = new XboxController();
if (!xp.isConnected())
{
JOptionPane.showMessageDialog(null,
"Xbox controller not connected.",
"Fatal error", JOptionPane.ERROR_MESSAGE);
xp.release();
return;
}
xp.addXboxControllerListener(new MyXboxControllerAdapter());
NxtRobot robot = new NxtRobot();
robot.addPart(motA);
robot.addPart(motB);
JOptionPane.showMessageDialog(
null,
"Ready to go." +
"\nLeft or right trigger to speed motors." +
"\nSTART to drive forward, BACK to drive backward." +
"\nOk to quit.",
"NxtDemo V1.0 (www.aplu.ch)",
JOptionPane.PLAIN_MESSAGE);
xp.release();
robot.exit();
}
public static void main(String[] args)
{
new NxtDemo();
}
}
Discussion: The Lego NXT robot runs in direct mode, where commands are transmitted from the PC to the robot via Bluetooth. We use the OOP-based library NxtJLib to communicate with the robot (see http:/www.aplu.ch/nxtjlib for more information), but the original leJOS direct command library (see http://lejos.sourceforge.net for more information) could also be used.
As usual the application is completely event controlled and, after initialization, the application thread is blocked in a modal dialog. The position values 0..1 of the left and right trigger control are mapped to the speed values 0..100 of the motors. Again we use an XboxControllerAdapter to avoid the implementation of the many listener methods.
Enjoy!:
Execute NxtDemo
using WebStart.
If the execution fails,
check the system requirements (see above)
|