|
BrickPiLib: A Library For The BrickPi Kit
Motivation
Learning programming with robots is very motivating. It is like game programming, but the actor is real and may present human aspects of movement and reaction. To maintain the interest and make the effort worthwhile, it is better you owe your personal robot. To build your own robot, you have several choices:
- you provide an industrial robot (very expensive, normally programmed in a special purpose language)
- you provide a fully-assembled educational robot (e.g. Pi2Go Ultimate)
- you provide an educational robot kit with no or little assembly variants (e.g. Pi2Go Kit)
- you provide an educational kit with a given computing brick, but many different assembly variants (e.g. Lego Mindstorm Education EV3)
- you provide a computing unit (Arduino, Raspberry Pi, etc.) and assemble motors and sensors and electronics circuits yourself.
The BrickPi is some kind of a hybrid: The brick is designed to be used with a Raspberry Pi microcontroller and Lego Mindstorm parts. So it combines the freedom of a standard wide-spread computing unit and the abundance of Lego accessories. It is a good solution if the Lego material (NXT or EV3) is already at hand, and the Raspberry Pi is preferred to the Lego EV3 computing brick.
BrickPi: Hardware Design Concept
It is an engineering challenge to combine the Raspberry Pi as computing engine with Lego Mindstorm accessories. With BrickPi Dexter Industries decided to use extra microcontrollers to link the Raspberry Pi with the Lego accessories.
In the former BrickPi/BrickPi+ two Arduino type microcontrollers (ATMEGA328) communicate with the Lego motors and sensors through two additional motor driver circuits. The Raspberry Pi and the ATMEGA are linked via the Serial (UART) protocol.
The newer BrickPi3 uses a Amtel 32-bit ARM microcontroller (ATSAMD21) and the SPI protocol for the communication link with the Raspberry Pi.
This concepts is elegant because only few pins of the Raspberry Pi GPIO are used for the communication. Fortunately the firmware on the additional microcontroller is fully transparent to the Python programmer of the Raspberry Pi.
Dexter provides a Python library for both versions. Because the hardware is completely different, the two library versions are not compatible and we decided to withdraw our support for the older BrickPi/BrickPi+.
BrickPiLib: An Object Oriented And State Based Robotics Library For The BrickPi3
In our opinion a software library for robotics must be based on the object oriented paradigm. We even think that robotics is one of the best field to demonstrate the strength of OOP and can provide profound insights into OOP for beginners. This is also because a real robot is naturally considered as "an object". So it is evident to model a robot and its accessories by software objects.
We introduced the OOP model for robotics with Lego NXT some ten years ago using Java and ported it to Lego EV3 in Java and Python, then to the Pi2Go (also in Java and Python) and now to the BrickPi (in Python only). But through all the years and many successful robotics courses the concept remained the same:
The robot and all accessories are modelled as objects, e.g. instances of the classes Button, OLED display, Motor, Gear, Sensor (of different types), etc. To use an object in the real word, you create a software object by calling its constructor, e.g. for the robot box, a motor or a touch sensor:
robot = LegoRobot()
motor = Motor(MotorPort.A)
ts = TouchSensor(SensorPort.S1)
The parameter of motors and sensors indicates the port where the cable is plugged-in.
Motor and sensor methods are used to control motors or read values from the sensors:
motor.forward()
if (ts.isPressed())
...
Since motor.forward() changes the state of the robot (from stopped to moving) the library is based on the state machine (automata) paradigm that is well-established in software design.
The BrickPiLib module sits on top of the BrickPi3 library provided by Dexter, but all classes and method calls of the Dexter library calls are still available (see documentation). So the examples that comes from Dexter may be run without modification.
The Standard BrickPi Rover With Lego EV3 Material
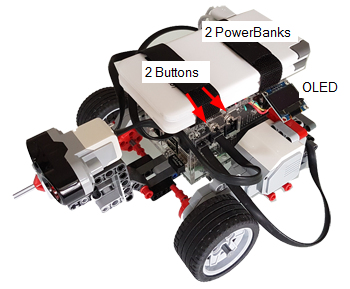
Most introductory courses in robotics are based on a moving robot with two front wheels driven by motors and a passive caster wheel at the rear. The BrickPi case is bigger in size than the EV3 brick, but it is still rather straightforward to build the rover. A suggestion is shown here:
|
|
|
|
General View
|
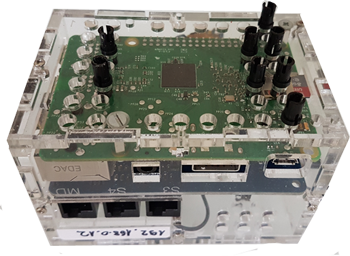
Case Fixation - Bottom View
|
?
|
|
|
|
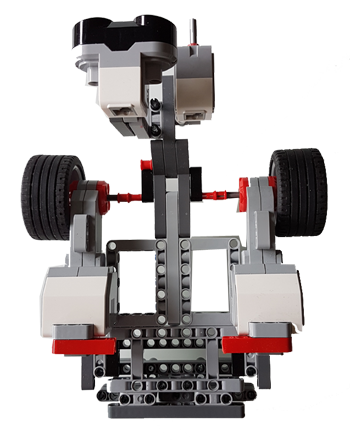
Chassis - Top View
|
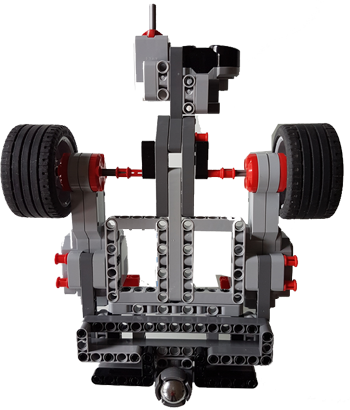
Chassis - Bottom View
|
The BrickPi is powered by two 5V power banks (at least 3500 mAh) wired in series. Be careful to remove the power output cable when charging the batteries to avoid a short-circuit when a single charger with two outputs is used. The active buzzer is plugged into GPIO pin 22 (GPIO25) and pin 25 (GND) (respect the polarity).
RaspiBrick for BrickPi: A Firmware Shell
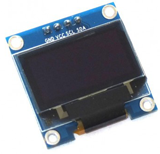
In a educational environment, a robot is not always connected to a remote development system and should be able to run user selectable programs at startup. This needs a simple firmware that is automatically started at boot time and at least one or several buttons and a simple display for human interaction. We provide a simple firmware written in Python called RaspiBrick that we adapted from a version running on the Pi2Go robot. As input device two pushbuttons wired to GPIO pin #16 and #18 (and ground) are used. They are managed by our thread-based button handler that supports press, release, click, double-click and long-press events, As output device we assume an OLED display 128x64 pixels based on the SSD1306 chip using the I2C protocol. A Python OLED handler is included in the library distribution (more information here). Connect the 4 wires as follows:
|
| OLED |
GPIO |
| GND |
Pin 6 |
| VCC (3.3V) |
Pin 1 |
| SDA |
Pin 3 |
| SCL |
Pin 5 |
|
|
|
Wiring
|
128x64 Pixels OLED Display
|
(Any brand of SSD1306-based OLED with 128x64 pixel resolution may be used.) For acoustical feedback an active buzzer (two wire model) is attached to GPIO pin #22 and GND. A thread driven Beeper class is part of the the library.
Either a Raspberry Pi 2 or 3 may be used, but no other models.
The firmware is included in our RaspiBrick [BrickPi] SD-card for the Raspberry Pi that can be downloaded from here. Just unzip the ZIP archive and copy the image to an empty SD-card of minimum 8 GB with any USB Image Tool as explained here.
As development tool we recommend to use TigerJython as explained below. At boot time a small RaspiBrick firmware written in Python shows useful information on the attached OLED (like the IP address obtained from the DHCP router). The left button is then used to perform some simple operations, like scrolling through up to 9 stored applications and start one of them or shut down the Raspberry Pi gently. In order to start your own Python script automatically at boot time (instead of the firmware), name it autostart.py and put it in the folder scripts. It is recommended to use this folder for all your scripts. You already find there some useful examples for demonstration and test. You may also download them from here.
Robotics Programming: A First Example
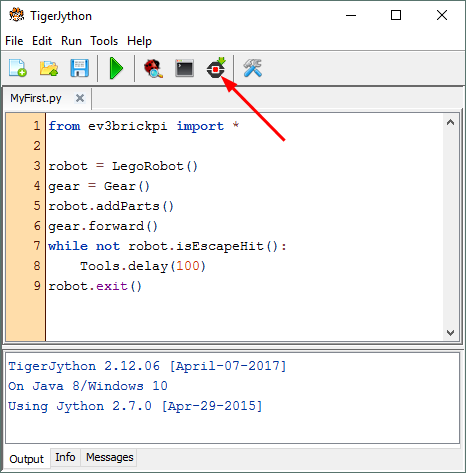
Let's assume you want to move the robot by rotating both motors until you press the push-button. The Python script becomes extremely simple, because the two motors are modelled as an object called a Gear. First you import the library module ev3brickpi. Then you create the objects robot and gear. After you set the gear in forward movement and wait in a loop, until the push-button is hit. Finally when you call exit(), the connection between the Raspberry Pi and the BrickPi module is closed and the motors stops automatically.
from ev3brickpi import *

robot = LegoRobot()
gear = Gear()
gear.forward()
while not robot.isEscapeHit():
    pass
robot.exit()
TigerJython: An Python IDE For Remote Microcontroller Development
With the TigerJython Python IDE it becomes very simple to edit/download and execute Python scripts on the Raspberry Pi. For any platform only a single JAR file is needed that can be downloaded from here.
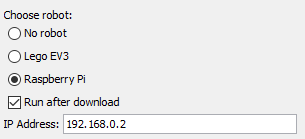
To enable remote development, you select Preferences and click the library tag. There you choose Raspberry Pi and enter the appropriate IP address.
To download and execute a program, you click the black button
Open the Tools menu, and you find more options to manage the Raspberry Pi.
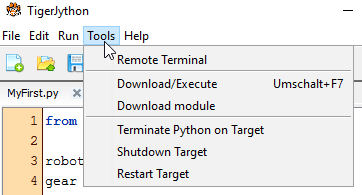
During development you may stop the RaspiBrick firmware by clicking "Terminate Python on Target". In this mode, you get back in the TigerJython Message window all output of your program sent to stdout (e.g. from print). This is very convenient to trace runtime errors or debug your program by adding extra print statements.
Running the RaspiBrick firmware you can execute up to 9 downloaded Python scripts by selecting them with a push-button double-click without the need of an external PC or an attached screen/keyboard.
RaspiRemoteManager: Remote Microcontroller Development With Any IDE
Many IDE are provided to execute "external command", among them Geany. We developed a cross-platform application RaspiRemoteManager.jar (download, incl. source) that executes the necessary SSH command to communicate with the RaspiBrick firmware. Copy it in any directory (e.g. c:\rrm) and modify the entries in Geany's Build | Set Build Commands as shown below:
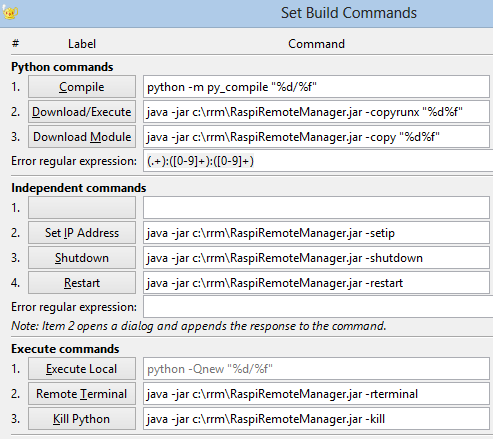
You can Copy&Paste the commands from the following lines:
| _Compile |
python -m py_compile "%d%f" |
| _Download/Execute |
java -jar c:\rrm\RaspiRemoteManager.jar -copyrunx "%d%f" |
| Download _Module |
java -jar c:\rrm\RaspiRemoteManager.jar -copy "%d%f" |
| Set _IP Address |
java -jar c:\rrm\RaspiRemoteManager.jar -setip |
| _Shutdow |
java -jar c:\rrm\RaspiRemoteManager.jar -shutdown |
| _Restart |
java -jar c:\rrm\RaspiRemoteManager.jar -restart |
| _Execute (local) |
python -Qnew "%d%f" |
| Remote _Terminal |
java -jar c:\rrm\RaspiRemoteManager.jar -rterminal |
| _Kill Python |
java -jar c:\rrm\RaspiRemoteManager.jar -kill |
|
 LinkUp
 TCPCom
 Simulations