| |
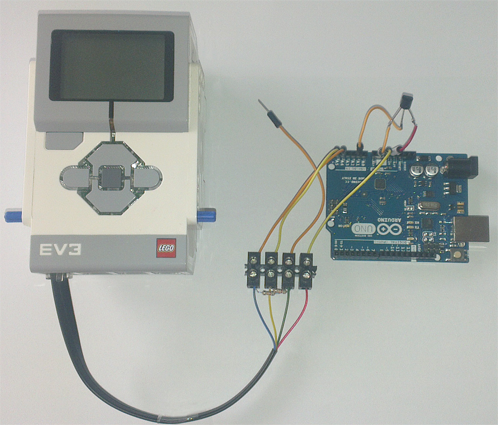
Connecting the EV3 and the Ardunio
Purpose: The Arduino is a cheap microcontroller system and many different kinds of interfaces are available (often called Arduino Shields). Programs are written in the C programming language with a somewhat simplified syntax, compiled to machine code, downloaded to the Arduino and executed there. It is a compelling challenge to use the Arduino and its hardware as front end processor to the EV3 to overcome some of the limits of the EV3 with external sensors, especially for accessing simple home-brew electronic devices.
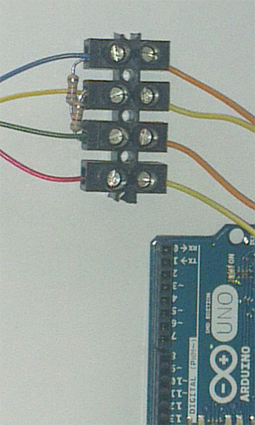
To link the EV3 and the Arduino, an I2C master-slave connection is established, where the EV3 acts as master and the Arduino is the slave. For the physical connection, two pull-up resistors are needed. When you cut a standard Lego Mindstorm sensor cable you see 6 wires colored white, black, red, green, yellow and blue (in this order). Use any kind of connection material (piece of printing board, terminal strip, screw terminal) to realize the following schematics. (If you have a soldering iron you may apply tin-coating to the wire endings.)

For the demonstration of how using sensors not available for the EV3, the output of a temperature sensor is connected to the analog input A1 of the Arduino (recommended sensor ICs: LM 35 (Texas Instruments), TEMP 35/36,37 (Analog Devices), AD22100 (Analog Devices)). The sensor IC is powered from Ardunio's GND/5V. To power the Arduino from the EV3, the green wire from the EV3 may be connected to the 5V post of the Arduino.
Circuitry using a screw terminal (5 V supply line not connected):
The Arduino is running as I2C slave using the Wire library. It receives a one-byte request from the EV3 and transmits a reply of maximum 16 bytes back to the EV3. Depending on your particular interest the program can be written for Java direct/autonomous or for Python direct/autonomous mode.
C program (Arduino sketch):
|
// I2CDemo
// Demonstration of I2C link to Lego EV3
// Run ArdunioDemo with Java or Python in direct or autonomous mode
#include <Wire.h>
#define SLAVE_ADDRESS 0x04
int blinking = 0;
byte request;
byte version[] = "ArduinoLink 1.0"; // Max 15 chars (16 with null)
byte onState[] = "on";
byte offState[] = "off";
void setup()
{
Wire.begin(SLAVE_ADDRESS);
Wire.onReceive(receiveData);
Wire.onRequest(sendData);
pinMode(13, OUTPUT); // On-board LED
pinMode(2, INPUT_PULLUP); // Switch Pin2-Ground
}
void loop()
{
if (blinking == 0)
return;
digitalWrite(13, HIGH);
delay(100);
digitalWrite(13, LOW);
delay(100);
}
void receiveData(int byteCount)
{
request = Wire.read();
}
void sendData()
{
// Command dispatcher
switch (request)
{
case 0: // stop blinking
blinking = 0;
break;
case 1: // start blinking
blinking = 1;
break;
case 2: // request version
Wire.write(version, sizeof version);
break;
case 3: // request switch state
if (digitalRead(2) == LOW)
Wire.write(offState, sizeof offState);
else
Wire.write(onState, sizeof onState);
break;
case 4: // request temperature
int val = analogRead(1); // Pin 1
char temp[14];
sprintf(temp, "%d", val);
Wire.write(temp, sizeof temp);
break;
}
}
|
Java autonomous/direct:
(You need the latest version of EV3JLib/EV3JLibA and EV3 firmware)
|
/ ArduinoDemo.java (direct or autonomous mode)
// Demonstration of I2C link to Arduino
// Run I2CDemo on Arduino
// System.out may be commmented out in autonomous mode
import ch.aplu.ev3.*;
public class ArduinoDemo
{
public ArduinoDemo()
{
LegoRobot robot = new LegoRobot();
ArduinoLink arduino = new ArduinoLink(SensorPort.S1);
robot.addPart(arduino);
robot.drawString("Arduino Link Test", 0, 0);
System.out.println("Link Test. Press up/dwn/lt/rt/enter/esc");
String msg;
int v;
while (!robot.isEscapeHit())
{
if (robot.isDownHit())
{
msg = "Blinking stopped";
System.out.println(msg);
robot.drawString(msg, 0, 2);
v = arduino.getReplyInt(0); // stop blinking
}
else if (robot.isUpHit())
{
msg = "Blinker started";
System.out.println(msg);
robot.drawString(msg, 0, 2);
v = arduino.getReplyInt(1); // start blinking
}
else if (robot.isEnterHit())
{
msg = arduino.getReplyString(2); // get version
System.out.println("Version: " + msg);
robot.drawString(msg, 0, 1);
}
else if (robot.isLeftHit())
{
msg = arduino.getReplyString(3); // get switch state
System.out.println("Switch:" + msg);
robot.drawString("State: " + msg, 0, 3);
}
else if (robot.isRightHit())
{
msg = arduino.getReplyString(4); // get temperature
System.out.println("Temperature: " + msg);
robot.drawString("Temp: " + msg, 0, 4);
}
}
robot.exit();
}
public static void main(String[] args)
{
new ArduinoDemo();
}
}
|
Python autonomous/direct:
(You need the latest version of TigerJython and EV3 firmware)
|
# ArduinoDemo.py (direct or autonomous mode)
# Demonstration of I2C link to Arduino
# Run I2CDemo on Arduino

from ev3robot import *

robot = LegoRobot()
arduino = ArduinoLink(SensorPort.S1)
robot.addPart(arduino)
robot.drawString("Arduino Link Test", 0, 0)
print "Arduino Link Test. Press up/down/left/right/enter/escape"
while not robot.isEscapeHit():
    if robot.isDownHit():
        msg = "Blinking stopped"
        print msg
        robot.drawString(msg, 0, 2)
        v = arduino.getReplyInt(0)  # stop blinking
    elif robot.isUpHit():
        msg = "Blinker started"
        print msg
        robot.drawString(msg, 0, 2)
        v = arduino.getReplyInt(1)  # start blinking
    elif robot.isEnterHit():
        msg = arduino.getReplyString(2)  # get version
        print "Version:", msg
        robot.drawString(msg, 0, 1)
    elif robot.isLeftHit():
        msg = arduino.getReplyString(3)  # get switch state
        print "Switch:", msg
        robot.drawString("State: " + msg, 0, 3)
    elif robot.isRightHit():
        msg = arduino.getReplyString(4)  # get temperature
        print "Temperature: ", msg
        robot.drawString("Temp: " + msg, 0, 4)
robot.exit()
|
| |
 LinkUp
 TCPCom
 Simulations