| |
The source code of all examples is included in the JDroidLib distribution.
Simulating The Physical World
The User Coordinate System
For computer programs that simulates the real physical world it is strongly recommended to use a cartesian coordinate system
(x, y, z) and standard units everywhere (SI system: m, kg, s, etc.). In this coordinate system the physical formulas remain
unchanged from theory to simulation. Unfortunately the mapping of the physical coordinates to the screen pixels is cumbersome, because the transformation depends on the device screen dimension, screen resolution and the positioning of the application window.
To assist you as much as possible, JDroidLib let you define a so called user coordinate system. In contrast to the integer pixel coordinate system with its origin at the upper left vertex, user coordinates uses doubles with horizontal x-axes and vertical y-axes where the x- and y-coordinate ranges are user definable when requesting the GGPanel window reference with GameGrid.getPanel(double xmin, double xmax, double ymin, double ymax). xmin corresponds to the left side, xmax to the right side, ymin to the bottom border and ymax to the top border. Because in most cases you need a coordinate system with equal units on both axes and the width-to-height ratio depends on the device, you can use GameGrid.getPanel(double ymin, double ymax, double xratio) where xratio determines where the origin is placed (e.g. xratio = 0.5 places it in the middle of the window, see figure below).
| |
|
|
| |
The user coordinate system |
Euler integration |
To draw into the window you use the GGPanel drawing methods that all takes double coordinates. In the GGPanel class you also find conversion methods from the pixel to the user coordinate system like toPixelX(), toPixelY(), toPixelDx(), toPixelDy() (and their inverse). Remember that the pixel coordinate system has its origin at the upper left vertex of the game grid window with the positive x-axis to the right and the positive y-axis downwards.
If you use actor or background images, the auto zoom feature of game grid should be enabled (see here for more information). To get the size of the actors in user coordinates, first obtain the current zoomed pixel dimension from the known image size with GameGrid.virtualToPixel(imageSize) and map it to user coordinates with GGPanel.toUserDx() or GGPanel.toUserDy().
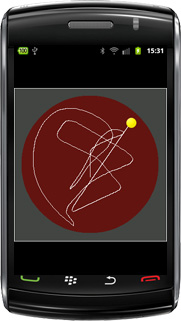
In the following app you learn by example how to develop apps for simulating the real world. We imagine a hockey puck that moves on a inclined flat surface and is subject to air friction (but not dry friction). Using data from the built-in gravitation sensor we can make the simulation much more realistic than with a standard computer simulation. The physics is elementary, even if friction is considered too. You find the vector notation of the first order approximations of velocity and position after a time interval dt in the figure above (f is the frictional constant). Instead of using the old velocity to calculate the new position, you can also use the new velocity (Euler-Cromer method).
We encapsulate the properties and behavior of the puck in the class Puck and put the code to calculate the new velocity and position in the act() method that is invoked automatically in every simulation cycle. The integration time interval dt corresponds to the simulation period. The implementation is straight-forward because we use the physical coordinate system.
package ch.aplu.movingpuck;
import android.graphics.*;
import ch.aplu.android.*;
class Puck extends Actor
{
private MovingPuck app;
// Physical variables (all in physical units)
private double x, y; // Position (m)
private double vx, vy; // Velocity (m/s)
private double ax, ay; // Acceleration (m/s^2)
private final double dt = 0.05; // Integration interval (s)
private final double f = 0.2; // Friction (s^-1)
public Puck(MovingPuck app)
{
super("puck");
this.app = app;
// Physical initial conditions:
x = 0;
y = 0;
vx = 0;
vy = 0;
}
public void act()
{
double[] a = app.sensor.getAcceleration(0);
double gx = -a[4];
double gy = a[3];
// New acceleration:
ax = gx - f * vx;
ay = gy - f * vy;
// New velocity:
double vxNew = vx + ax * dt;
double vyNew = vy + ay * dt;
// New position:
double xNew = x + vxNew * dt;
double yNew = y + vyNew * dt;
// Test if in court
if (!isInside(xNew, yNew)) // No->set speed to zero
{
vx = 0;
vy = 0;
return; // and quit
}
setLocation(new Location(app.p.toPixelX(xNew), app.p.toPixelY(yNew)));
app.p.line(new PointD(x, y), new PointD(xNew, yNew));
vx = vxNew;
vy = vyNew;
x = xNew;
y = yNew;
}
private boolean isInside(double x, double y)
{
double R = 0.9 * app.courtSize / 2 - app.ballRadius;
return x * x + y * y <= R * R;
}
} |
We limit the movement to the circular court by setting the velocity to zero when the puck reaches the circumference. The dimension of the court and the size of the puck is provided by the app class.
package ch.aplu.movingpuck;
import ch.aplu.android.*;
import android.graphics.*;
public class MovingPuck extends GameGrid
{
protected final double courtSize = 10; // m
protected double ballRadius;
protected GGComboSensor sensor;
protected GGPanel p;
public MovingPuck()
{
super(WHITE, windowZoom(600));
}
public void main()
{
// Coordinate system in user coordinates, origin in court center
p = getPanel(-courtSize / 2, courtSize / 2, 0.5);
p.setAutoRefreshEnabled(false);
setSimulationPeriod(50);
ballRadius = p.toUserDx(virtualToPixel(20)); // Sprite radius 20 px
p.clear(DKGRAY);
sensor = GGComboSensor.init(this);
p.setPaintColor(Color.rgb(100, 20, 20));
p.circle(new PointD(0, 0), 0.9 * courtSize / 2, true);
p.setPaintColor(Color.WHITE);
Puck puck = new Puck(this);
addActor(puck, new Location(getNbHorzCells() / 2, getNbVertCells() / 2));
doRun();
}
}
|
Because we take the acceleration from a[3] and a[4], the app works fine with all four device orientations (selected when the app is launched). Hopefully this simple example inspires you to develop funny games with rolling marbles..

Download MovingPuck app for installation on a smartphone
Create QR code to download Android app to your smartphone.
Download sources (MovingPuck.zip)
Two-Body Motion
Lauching A Spacecraft With A Fling
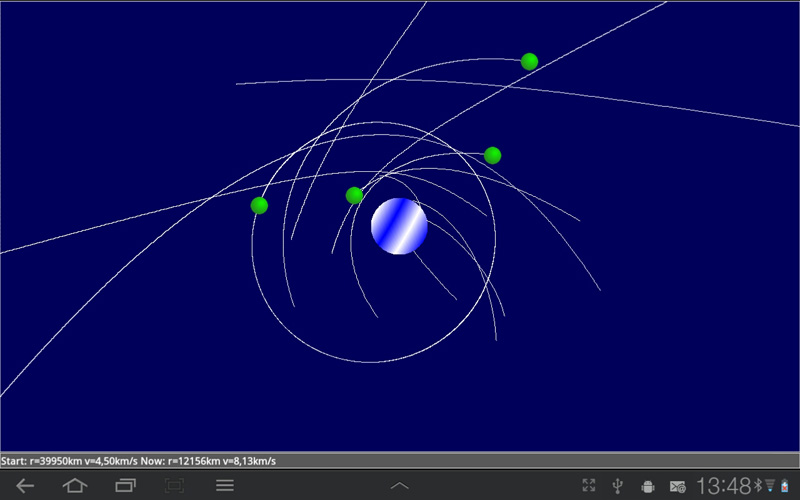
As you saw in the previous example, it is tempting to develop games and simulations that make use of the special hardware gadgets of mobile devices. In the next example we use the fling feature to launch a spacecraft in the radial gravitational field of a central mass (like a spacecraft somewhere between the earth and the moon). By your finger movement you select the initial position and velocity and then you exercise the dynamics of the two-body motion with fixed central mass (Kepler orbits, see here).
It is common to define physical constants in an interface:
package ch.aplu.twobodymotion;
interface Constants
{
static final double G = 6.67E-11; // Gravitation constant (m^3/kg/s^2)
static final double R = 6370E3; // Radius of earth in (m)
static final double m = 5.97E24; // Mass of earth (kg)
}
|
In the class Spaceship we make use of the vector notation that simplifies and clarifies the code. But you may end in a classical pitfall: The assignment GGVector w = v does not create a new vector w with duplicated components, but a new vector reference w that is identical to the v reference. Both vectors points to the same values and if you change a component in one vector, it also changes its value in the other vector. To get really a new independent vector w, you must use GGVector w = v.clone() or GGVector w = new GGVector(v).
As you see in the code, we destroy the spaceship when it falls on the central mass. Eliminating the body when it is near the central mass also reduces the problem of integration errors when the spaceship moves rapidly. We use here an integration time step dt = 50 s that is sufficiently small to avoid visible errors if the simulation does not last too long. Since we set the simulation period to 25 ms, this gives us a simulation time scale with a speed-up of 2000.
package ch.aplu.twobodymotion;
import ch.aplu.android.*;
class Spaceship extends Actor
{
private TwoBodyMotion app;
private static Spaceship currentShip;
// Physical variables:
private GGVector r; // Position (m)
private GGVector v; // Velocity (m/s)
private GGVector a; // Acceleration (m/s^2)
private GGVector rStart;
private GGVector vStart;
public Spaceship(TwoBodyMotion app, GGVector rStart, GGVector vStart)
{
super("body");
this.app = app;
currentShip = this;
this.rStart = rStart.clone();
this.vStart = vStart.clone();
// Physical initial conditions:
r = rStart;
v = vStart;
}
public void act()
{
double dt = 50; // Every simulation cycles corresponds to 50 s in reality
// New acceleration
double rnorm = r.magnitude();
a = r.mult(-Constants.G * Constants.m / (rnorm * rnorm * rnorm));
// New velocity
GGVector vNew = v.add(a.mult(dt));
// New position
GGVector rNew = r.add(vNew.mult(dt));
if (rNew.magnitude() < Constants.R) // Hit the central mass
removeSelf();
setLocation(
new Location(app.p.toPixelX(rNew.x), app.p.toPixelY(rNew.y)));
app.p.line(new PointD(r), new PointD(rNew));
if (currentShip == this)
{
if (isRemoved())
app.status.setText(
String.format("Crashed on earth with v=%4.2f km/s",
v.magnitude() / 1000));
else
app.status.setText(
String.format("Start: r=%4.0fkm v=%4.2fkm/s"
+ " Now: r=%4.0fkm v=%4.2fkm/s", rStart.magnitude() / 1000,
vStart.magnitude() / 1000, r.magnitude() / 1000,
v.magnitude() / 1000));
}
r = rNew;
v = vNew;
}
} |
In the main() method we create a user coordinate system with getPanel(-50E6, 50E6, 0.5). Consequently the origin is in the center of the window and the window height corresponds to 100'000 km (roughly 1/3 the distance from the earth to the moon).
package ch.aplu.twobodymotion;
import ch.aplu.android.*;
import android.graphics.*;
public class TwoBodyMotion extends GameGrid
implements GGFlingListener
{
protected GGStatusBar status;
protected GGPanel p;
public TwoBodyMotion()
{
super(WHITE, false, true, windowZoom(1000));
setScreenOrientation(LANDSCAPE);
status = addStatusBar(25);
}
public void main()
{
p = getPanel(-50E6, 50E6, 0.5);
p.setAutoRefreshEnabled(false);
setSimulationPeriod(25);
p.clear(Color.rgb(0, 0, 90));
Shader shader =
new RadialGradient(0, 0, 30, BLUE, WHITE, Shader.TileMode.MIRROR);
Shader oldShader = p.setShader(shader);
p.circle(new PointD(0, 0), Constants.R, true);
p.setPaintColor(WHITE);
p.setShader(oldShader);
addFlingListener(this);
doRun();
status.setText("Please launch a spaceship!");
}
public boolean flingEvent(Point start, Point end, GGVector velocity)
{
GGVector rStart = new GGVector(p.toUserX(end.x), p.toUserY(end.y));
GGVector vStart = new GGVector(20000 * velocity.x, -20000 * velocity.y);
Spaceship spaceship = new Spaceship(this, rStart, vStart);
addActor(spaceship, new Location(end.x, end.y));
return true;
}
} |
It's up to you to simulate the N-body problem where all masses you fling interact mutually.
Download TwoBodyMotion app for installation on a smartphone
Create QR code to download Android app to your smartphone.
Download sources (TwoBodyMotion.zip)

| |


 LinkUp
 TCPCom


 Simulations


