| |
The source code of all examples is included in the JDroidLib distribution.
The XOR Paint Mode
In many picture drawing applications some shapes, especially lines or rectangles, are drawn temporary over an existing image and the removed. If the shape is drawn in normal paint mode into the image buffer, this operation is quite expensive and may suffer of bad responsiveness during a mouse/touch dragging sequence when many draw/erase operations happen in rapid succession. To speed up the draw/erase operation the shape may be drawn into the image buffer in XOR mode where the temporary shape is used as a mask to transform the pixels of the image buffer. If a is one of the 24 color bits of the image and b the corresponding bit of the temporary shape, a first XOR operation modifies the color bit to a'. If the same operation is applied a second time, the result a'' is identical to a and the original image is restored.
| a |
b |
a' = a XOR b |
b |
a'' = a' XOR b |
| 0 |
0 |
0 |
0 |
0 |
| 0 |
1 |
1 |
1 |
0 |
| 1 |
0 |
1 |
0 |
1 |
| 1 |
1 |
0 |
1 |
1 |
There is a drawback: The colors of the temporary image using a' does not correspond to the colors of the temporary shape. While dragging this is not of particular importance and may even be beneficial because the temporary shape is always visible even if the colors of the background image and the dragging shape are the same.
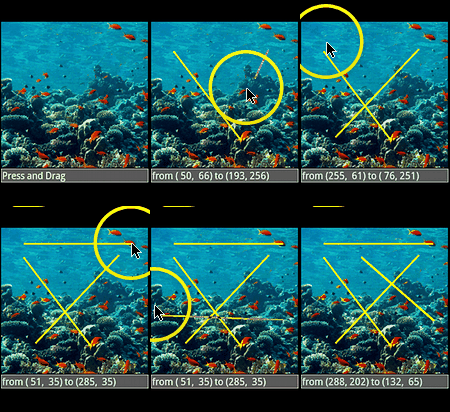
The Android API does not support the XOR paint mode directly. So we added it in the GGBackground class be performing the XOR operation in a library method. The first example shows the famous "rubber band" operation where a line is attached at the finger touch location (press event) and may be varied until the finger lifts of the screen (or leaves the screen).
package ch.aplu.tut;
import ch.aplu.android.*;
public class Ex13 extends GameGrid implements GGTouchListener
{
private GGStatusBar status;
private int xStart;
private int yStart;
private int xEnd;
private int yEnd;
public Ex13()
{
super("reef", windowZoom(500));
status = addStatusBar(30);
}
public void main()
{
status.setText("Press and Drag");
refresh();
addTouchListener(this, GGTouch.press | GGTouch.drag | GGTouch.release);
getBg().setPaintColor(YELLOW);
getBg().setLineWidth(4);
}
public boolean touchEvent(GGTouch touch)
{
if (touch.getEvent() == GGTouch.press)
{
xStart = xEnd = touch.getX();
yStart = yEnd = touch.getY();
getBg().setXORMode();
}
if (touch.getEvent() == GGTouch.drag)
{
getBg().drawLine(xStart, yStart, xEnd, yEnd);
xEnd = touch.getX();
yEnd = touch.getY();
getBg().drawLine(xStart, yStart, xEnd, yEnd);
refresh();
}
if (touch.getEvent() == GGTouch.release)
{
getBg().setPaintMode();
xEnd = touch.getX();
yEnd = touch.getY();
getBg().drawLine(xStart, yStart, xEnd, yEnd);
status.setText(String.format("from (%3d, %3d) to (%3d, %3d)",
xStart, yStart, xEnd, yEnd));
refresh();
}
return true;
}
} |
Discussion: We register the press, drag and release events of a TouchListener. When the press event is triggered, we enter the XOR mode and save the current touch location in instance variables, because we use them in later calls of the touchEvent() callback. At each drag event the old line is erased by using the old start and end positions and drawn using the new end position. When the release event is triggered, we restore the paint mode and draw the line definitely.
Because the simulation cycling is not enabled, we must call refresh() by our own code to update the screen.
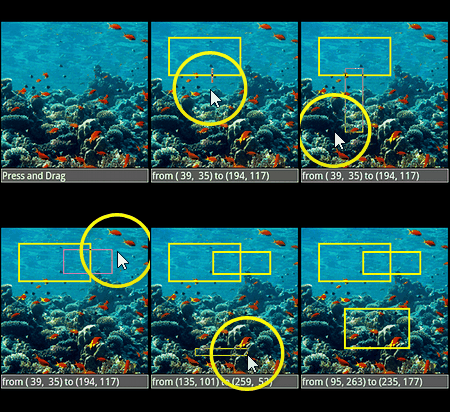
In the next example a rectangular area is selected by a touch press-drag-release action. Again the XOR mode is used. The program logic remains the same.
package ch.aplu.tut;
import ch.aplu.android.*;
public class Ex14 extends GameGrid implements GGTouchListener
{
private GGStatusBar status;
private int xStart;
private int yStart;
private int xEnd;
private int yEnd;
public Ex14()
{
super("reef", windowZoom(500));
status = addStatusBar(30);
}
public void main()
{
status.setText("Press and Drag");
refresh();
addTouchListener(this, GGTouch.press | GGTouch.drag | GGTouch.release);
getBg().setPaintColor(YELLOW);
getBg().setLineWidth(4);
}
public boolean touchEvent(GGTouch touch)
{
if (touch.getEvent() == GGTouch.press)
{
xStart = xEnd = touch.getX();
yStart = yEnd = touch.getY();
getBg().setXORMode();
}
if (touch.getEvent() == GGTouch.drag)
{
getBg().drawRectangle(xStart, yStart, xEnd, yEnd);
xEnd = touch.getX();
yEnd = touch.getY();
getBg().drawRectangle(xStart, yStart, xEnd, yEnd);
refresh();
}
if (touch.getEvent() == GGTouch.release)
{
getBg().setPaintMode();
xEnd = touch.getX();
yEnd = touch.getY();
getBg().drawRectangle(xStart, yStart, xEnd, yEnd);
status.setText(String.format("from (%3d, %3d) to (%3d, %3d)",
xStart, yStart, xEnd, yEnd));
refresh();
}
return true;
}
} |
It is tempting to implement the rectangle dragging by a two finger movement as follows: When the first finger taps the screen, nothing is seen. When the second finger taps the screen, the selection rectangle with vertexes at the current finger locations is shown in XOR mode. As long as both fingers touch the screen the rectangle position is adapted to the current finger locations. If a third finger touches the screen, nothing happens. As soon as the first or the second finger lifts off the screen, the selection rectangle is displayed at its final position.
The code registers a GGMultiTouchListener that fires the multiTouchEvent() callback and is a good training for computational thinking in an event driven environment.
package ch.aplu.tut;
import ch.aplu.android.*;
public class Ex14a extends GameGrid implements GGMultiTouchListener
{
private int xStart;
private int yStart;
private int xEnd;
private int yEnd;
private boolean isRectangleDragging;
public Ex14a()
{
super("reef", windowZoom(500));
}
public void main()
{
addMultiTouchListener(this,
GGMultiTouch.press
| GGMultiTouch.pointerPress
| GGMultiTouch.pointerRelease
| GGMultiTouch.drag);
getBg().setPaintColor(YELLOW);
getBg().setLineWidth(4);
}
public boolean multiTouchEvent(GGMultiTouch multiTouch)
{
int x = multiTouch.getX();
int y = multiTouch.getY();
int pointerId = multiTouch.getPointerId();
switch (multiTouch.getEvent())
{
case GGMultiTouch.press: // first finger
xStart = xEnd = x;
yStart = yEnd = y;
getBg().setXORMode();
isRectangleDragging = false;
break;
case GGMultiTouch.pointerPress:
if (pointerId == 1) // Second finger
{
isRectangleDragging = true;
xEnd = x;
yEnd = y;
getBg().drawRectangle(xStart, yStart, xEnd, yEnd);
}
break;
case GGMultiTouch.drag: // any finger
if (!isRectangleDragging || pointerId > 1)
break;
getBg().drawRectangle(xStart, yStart, xEnd, yEnd);
if (pointerId == 0)
{
xStart = x;
yStart = y;
}
if (pointerId == 1)
{
xEnd = x;
yEnd = y;
}
getBg().drawRectangle(xStart, yStart, xEnd, yEnd);
break;
case GGMultiTouch.pointerRelease: // any finger
if (!isRectangleDragging || pointerId > 1)
break;
isRectangleDragging = false;
getBg().setPaintMode();
getBg().drawRectangle(xStart, yStart, xEnd, yEnd);
break;
}
refresh();
return true;
}
} |
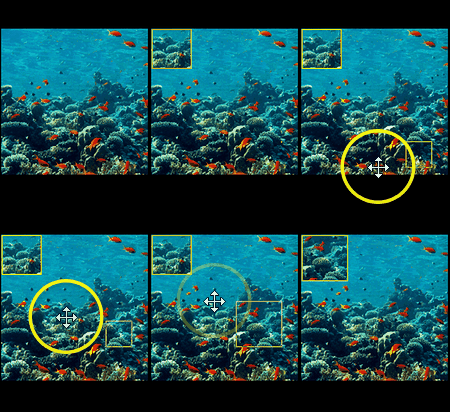
Discussion: Consult the tutorial on multi-touch events for more information about the GGMultiTouch event types and the pointer ID.
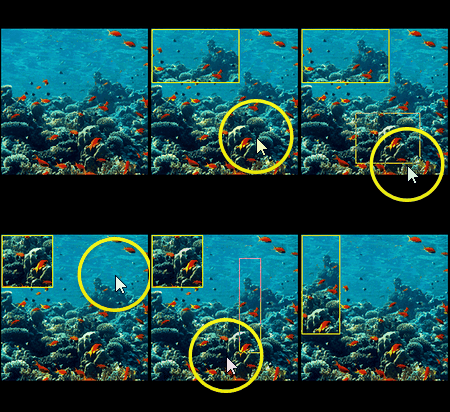
A typical use of rectangular selection is the image crop action where a part of the image is selected on redisplayed. In the following example we use the static crop() method of the GGBitmap class.
package ch.aplu.tut;
import android.graphics.Color;
import android.graphics.Point;
import ch.aplu.android.*;
public class Ex15 extends GameGrid implements GGTouchListener
{
private int xStart;
private int yStart;
private int xEnd;
private int yEnd;
public Ex15()
{
super("reef", windowZoom(500));
}
public void main()
{
refresh();
addTouchListener(this, GGTouch.press | GGTouch.drag | GGTouch.release);
getBg().setXORMode();
getBg().setPaintColor(YELLOW);
getBg().setLineWidth(4);
}
public boolean touchEvent(GGTouch touch)
{
if (touch.getEvent() == GGTouch.press)
{
xStart = xEnd = touch.getX();
yStart = yEnd = touch.getY();
}
if (touch.getEvent() == GGTouch.drag)
{
getBg().drawRectangle(xStart, yStart, xEnd, yEnd);
xEnd = touch.getX();
yEnd = touch.getY();
getBg().drawRectangle(xStart, yStart, xEnd, yEnd);
refresh();
}
if (touch.getEvent() == GGTouch.release)
{
xEnd = touch.getX();
yEnd = touch.getY();
getBg().drawRectangle(xStart, yStart, xEnd, yEnd);
int width = Math.abs(xEnd - xStart);
int height = Math.abs(yEnd - yStart);
if (width < 20 || height < 20)
return true;
GGBitmap bm = new GGBitmap(width, height);
bm.drawImage(GGBitmap.crop(getBg().getBgImage(),
xStart, yStart, xEnd, yEnd), 0, 0);
bm.setLineWidth(4);
bm.setPaintColor(Color.YELLOW);
bm.drawRectangle(new Point(0, 0), new Point(width, height));
removeAllActors();
addActorNoRefresh(new Actor(bm.getBitmap()),
new Location(width / 2, height / 2));
refresh();
}
return true;
}
} |
Discussion: Because we want to show the cropped image surrounded by a yellow border in the upper left part of the screen window, we create a GGBitmap instance, copy the cropped image into it and draw the border rectangle. We then use this GGBitmap instance to create an Actor sprite image. Finally we add the actor to the GameGrid and call refresh() to make it visible.
For same applications it is necessary to keep a given aspect ratio, expressed as quotient of the rectangle width to its height. For your ease GGBackground provides the method drawRectangle(Point pt1, Point pt2, double ratio, boolean isHorz) where isHorz decides whether pt2 is a point on the horizontal or vertical rectangle side opposite to the corner pt1. To restrict the crop area to a square in the preceding example, the three lines with
getBg().drawRectangle(xStart, yStart, xEnd, yEnd);
are replaced by
getBg().drawRectangle(
new Point(xStart, yStart), new Point(xEnd, yEnd), 1, true);
This overloaded version of drawRectangle() returns the second corner of the restricted rectangle used by the crop operation.
A aesthetically pleasant application using this technique is the Mandelbrot set.
| |
 LinkUp
 TCPCom


 Simulations


