In the following tutorial we introduce to the fundamental ideas of the JDroidGrid framework. The paradigm of "Learning by Examples" is applied where each little example is fully functional and has a special didactical intension. The examples are not mature smartphone apps, but serve as demonstration of a specific feature of JDroidLib. All sources and sprite images are included in the JDroidLib distribution.
|
JDroidLib's main() Method
In the following tutorial we assume that you installed the Eclipse or Netbeans IDE and the JDroidLib environment as explained in Installation&Use. In particular you should create a easily accessible link to start the Android ProjectManager and provide the necessary library folder containing JDroidLib.jar. (If you have troubles with the installation, don't hesitate to send a rescue mail to support@aplu.ch.) Even if you are not used to one of these IDEs we recommend giving them a try just for the purpose of this tutorial until you install JDroidLib with your favourite IDE. This may reduce the complexity of IDE + Java + Android + Smartphone.
Start the IDE and create a new Android project. In this tutorial the project home folder is e:/mynb/A_Tut (for Mac and Linux the drive letters here and later on are unneeded). Open the ProjectManager and fill out the text fields, e.g.
As you see, we use the package name ch.aplu.tut, the application name Ex01, the library folder c:/jars. The sprites and media folders are unnecessary because in this first example we don't use any sprite nor media files. When you click Build the project is miraculously prepared for you and a source template Ex01.java is created in the subdirectory ch/aplu/tut of the project's source folder. You may need to refresh your project to see it.
// Ex01.java
package ch.aplu.tut;
import ch.aplu.android.*;
public class Ex01 extends GameGrid
{
public Ex01()
{
super(10, 10, 0, RED);
}
public void main()
{
showToast("Ex01 started");
}
}
|
Connect your smartphone to the USB port and press the Run button within your IDE. Your app should be build, downloaded and started on the device. It shows an empty red grid with 10x10 cells and the text Ex01 started is display in the title bar. Changing the device orientation from portrait to landscape should restart the app. Many things may go wrong and stay hopeful even if you get error messages or nothing happens on your smartphone. Try to track them down by analyzing the error messages. Read the Installation&Use carefully to see if and how you must install your smartphone's USB drivers. If you don't bring it to work send an email to support@aplu.ch and explain your troubles in details.
Now you have a working developing system, it's time to get introduced to the basic concepts of Java on Android and the JDroidLib framework. Of course studying one of the many textbooks about Android programming may help you a lot (and takes a lot of time), but, because this tutorial assumes only basic knowledge of Java and no special any prior skills of Android programming, you may just start programming Android apps from here.
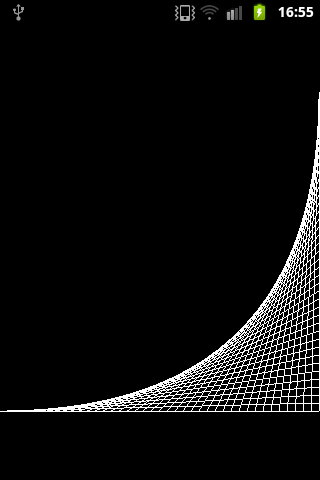
The above source template is just to test the development system, not the real starting point of our tutorial. Text based apps link the famous Hello Android program are not very pleasant. We like graphics, game and multimedia programming, so as starter for our tutorial we produce a lovely line drawing that gives the impression of a three dimensional surface.
Seems to be rather complicated at the first glance. Don't be afraid, it just a snap since JDroidLib provides a graphics screen with user definable coordinate system. But first a (very) short explication of how the Android operation system handles applications: Each app runs as an individual Linux process with its own Dalvik virtual machine that interprets your Android application package binary code (apk) that is compiled/created/installed by your development system. When you start an Android app on the smartphone, the predefined callback method onCreate() is invoked. This is the entry point of your app (and not the famous public static void main() of Java SE). Because an app takes over the whole screen, your app must be informed if some events of higher priority happen, e.g. a phone call. In this case other callback methods are invoked by the system and it is up to you to handle them. In order to simplify this rather complicated multithreading-based system as much as possible, JDroidLib intercepts all these calls. The following design decisions are implemented:
- When the app is launched, the method main() is called (in an own JDroidLib specific thread, called main-thread)
- Priority events like external phone calls or pressing the home button terminates the app by killing the Linux process
Especially the brute force termination is refused by the Android developers. But it is a secure solution to guarantee that no smartphone's activity, especially costly Internet communications, is continued in the background invisible to the user.
main() is a method of the class GameGrid with an empty implementation called when the app is launched. By deriving your your own application class from GameGrid and overriding main(), due to polymorphism you will get the entry point of your app.
There is a drawback of this concept to keep firmly in mind: Since all application specific initialization is performed internally by the onCreate() callback before the main-thread is started, most of your code must run in main() and not in the constructor nor in the class initializer section (by intializing instance variables) of your application class. But once you accept this guidelines, your program code becomes very simple because when you get your main() invocation, everything is internally prepared for you.
By deriving your application class from GameGrid you gain access to the multitude of methods of GameGrid. In our first example we request a reference to a class GGPanel that provides a graphics window with a user-definable coordinate system defined by the minimal and maximal x and y values. GGPanel is derived from GGBackground and inherits a classical panoply of graphics drawing methods. As claimed before, the code to generate the nice graphics is straightforward and looks like a program in the good old world of procedural programming in the eighties of the last century.
package ch.aplu.tut;
import ch.aplu.android.*;
public class Ex01 extends GameGrid
{
private final int n = 40;
public void main()
{
GGPanel p = getPanel(0, n, 0, n);
for (int i = 0; i <= n; i++)
p.line(i, 0, n, i);
}
}
|
Download Android app for installation on a smartphone or emulator.
Download sources (Ex01.zip).
Create QR code to download Android app to your smartphone.
Install/Start app on a USB connected smartphone or a running emulator.
(This is a WebStart signed by the University of Berne, Switzerland. It installs some helper files in <userhome>.jdroidtools.If you did not install the Android SDK, you may install a slim version of the Android-Emulator in <userhome>.jdroidemul using this link, To start the emulator, execute ExecEmul.jar found in <userhome>.jdroidemul)
(Continued in Tutorial 2)
|  LinkUp
 TCPCom
 Simulations