The source code of all examples is included in the JDroidLib distribution.
You must add the following two lines as second to last lines in
AndroidManifest.xml
(the line before </manifest>):
<uses-permission android:name="android.permission.BLUETOOTH" />

<uses-permission android:name="android.permission.BLUETOOTH_ADMIN" />
(or check the "Use Bluetooth" checkbox in ProjectBuilder)
Android Lego NXT Library Addon
The modern world is full of computers that communicates among each other. Therefore computer communication is a very attractive field of programming and passionate students and teachers more and more. The network theory based on the OSI model is too abstract for beginners. To motivate students in Java programming courses, a more pragmatic teaching concept is preferable by using didactical oriented Java libraries. The Android API provides many classes for TCP/IP socket programming and Bluetooth communication, but it may be difficult and frustrating to use them without a "smoothing library layer" to explain the fundamental concepts of computer communication.
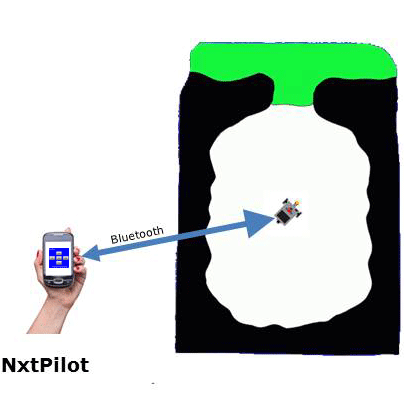
The most elementary scenario for controlling a remote unmanned moving robot like a vehicle, a underwater robot or a airplane works as follows: The controller person uses a computer program that sends commands to a remote computer (normally an embedded system that is part of the robot) that acts on electrical or mechanical devices like motors, switches, valves, etc. The remote computer reads sensor data and transmit them back to the controller to inform him about the current state of the robot.
Our very first example moves the NXT robot on a square. It's like programming turtle graphics because the class TurtleRobot provides the usual move methods: forward(distance), backward(distance), left(angle) and right(angle). The program is an order of magnitude simpler than when using the underlying Android and leJOS API. As you see, programming Android with JDroidLib is as simple as programming in time of TurboBasic and TurboPascal.
package ch.aplu.nxtbasic;
import ch.aplu.android.*;
import ch.aplu.android.nxt.*;
public class NxtBasic extends GameGrid
{
public void main()
{
GGConsole c = GGConsole.init();
c.println("NxtBasic starting...");
TurtleRobot robot = new TurtleRobot(c.getActivity());
robot.connect();
if (!robot.isConnected())
{
c.println("Connection to robot failed.");
return;
}
c.println("Working now...");
for (int i = 0; i < 4; i++)
{
robot.forward(100);
robot.left(90);
}
robot.exit();
c.println("Connection closed.");
}
}
|
The GGConsole shows a console window like an OS shell with scrolling facilities that is convenient for many robot applications where displaying state information is enough. You create a TurtleRobot instance by passing a reference to the current Android activity, because the Robot class must have access to the smartphones Bluetooth system and displays an edit box to ask for the NXT Bluetooth name. Moreover it show toast messages when connection is engaged by calling connect(). (You can use other constructors to suppress these messages.) One thing is very important: you should always cleanup the NXT connection by calling exit(); otherwise the next connection trial will fail unless you turn the NXT off and on again. This may cause a problem because you may hit the Home button on your smartphone and the apps will end without calling exit().
To get a notification when the Home button is hit, we may create an inner class MyConsole that extends from GGConsole and override the onPause() method, where we invoke exit():
private class MyConsole extends GGConsole
{
public void onPause()
{
robot.exit();
}
}
In main() GGConsole c = GGConsole.init() is replaced by MyConsole c = new MyConsole().
Download Android app for installation on a smartphone
Create QR code to download Android app to your smartphone.
Download sources (NxtBasic.zip).
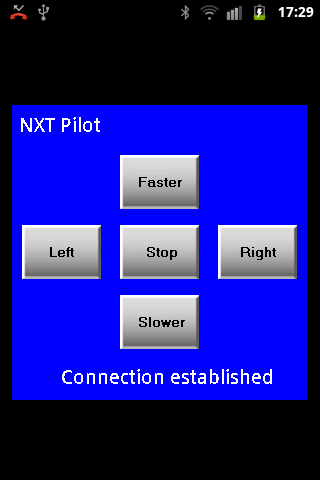
The Lego NXT robot provides a fantastic and affordable learning environment for roboting. It can now be easily driven by an Android app over Bluetooth using the NXT library addon of JDroidLib. In our first example the smartphone is used as a remote control for the NXT robot.
For the purpose of demonstration only a very simple user interface with 5 buttons is implemented. The robot may advance faster or slower, turn on a left or right arc with different radius and stop. The Android app uses a GameGrid window with 5 button actors. We assume that you have a basic idea of the GameGrid concept (see http://www.aplu.ch/jgamegrid). So we focus our attention on the NXT library addon classes.
|
package ch.aplu.nxtpilot;
import ch.aplu.android.*;
import ch.aplu.android.nxt.*;
import android.graphics.Color;
public class NxtPilot extends GameGrid
implements GGPushButtonListener
{
private NxtRobot robot;
private Gear gear;
private GGPushButton faster;
private GGPushButton slower;
private GGPushButton left;
private GGPushButton right;
private GGPushButton stop;
private int speed = 0;
private final int speedInc = 2;
private int direction;
private final int directionInc = 5;
public NxtPilot()
{
super(21, 21, 0);
setScreenOrientation(PORTRAIT);
}
public void main()
{
getBg().clear(Color.BLUE);
new GGTextField("NXT Pilot",
new Location(0, 1), true).show();
addButtons();
robot = new NxtRobot(this);
if (robot.connect() != NxtRobot.ConnectState.CONNECTED)
{
new GGTextField("Connection failed", new Location(4, 19),
true).show();
return;
}
new GGTextField("Connection established", new Location(3, 19),
true).show();
gear = new Gear();
robot.addPart(gear);
gear.setSpeed(0);
enableButtons();
}
private void addButtons()
{
faster = new GGPushButton("faster");
faster.setRepeatPeriod(100);
addActor(faster, new Location(10, 5));
slower = new GGPushButton("slower");
slower.setRepeatPeriod(100);
addActor(slower, new Location(10, 15));
left = new GGPushButton("left");
addActor(left, new Location(3, 10));
right = new GGPushButton("right");
addActor(right, new Location(17, 10));
stop = new GGPushButton("stop");
addActor(stop, new Location(10, 10));
}
private void enableButtons()
{
faster.addPushButtonListener(this);
slower.addPushButtonListener(this);
left.addPushButtonListener(this);
right.addPushButtonListener(this);
stop.addPushButtonListener(this);
}
public void onPause()
{
if (robot != null)
robot.exit();
super.onPause();
}
public void buttonPressed(GGPushButton button)
{
if (!robot.isConnected())
{
showToast("Robot not connected");
return;
}
if (button == faster)
faster();
if (button == slower)
slower();
if (button == left)
turnLeft();
if (button == right)
turnRight();
if (button == stop)
doStop();
}
public void buttonReleased(GGPushButton button)
{
}
public void buttonClicked(GGPushButton button)
{
}
public void buttonRepeated(GGPushButton button)
{
if (button == faster)
faster();
if (button == slower)
slower();
if (button == left)
turnLeft();
if (button == right)
turnRight();
}
private void faster()
{
if (speed < 100)
{
speed += speedInc;
gear.setSpeed(speed);
doIt();
}
}
private void slower()
{
if (speed > 0)
{
speed -= speedInc;
gear.setSpeed(speed);
doIt();
}
}
private void doStop()
{
speed = 0;
gear.setSpeed(0);
gear.stop();
}
private void turnLeft()
{
direction += directionInc;
doIt();
}
private void turnRight()
{
direction -= directionInc;
doIt();
}
private void doIt()
{
double radius;
if (direction == 0)
radius = 1000; // Quasi-straight
else
radius = Math.abs(0.1 / Math.sin(Math.toRadians(direction)));
if (direction > 0)
gear.leftArc(radius);
else
gear.rightArc(radius);
}
}
|
The Android NXT Library addon is based on the same OOP design used for the NxtJLib library and communicates with the Lego brick in direct mode. The NXT brick is modeled as an instance of the class NxtRobot. After instantiation the connect() method performs the Bluetooth connection to the brick and returns information about the success of the connection process. Remember that it is necessary to pair the Android smartphone and the NXT brick. The pairing must be initiated by the smartphone because the NXT Bluetooth MAC address has to added to the Bluetooth preknown database of bonded devices. It is not necessary to turn on the Bluetooth visibility of the smartphone, but the NXT Bluetooth must be powered-on and visible. After the connection is established, the Android application uses exactly the same methods as in the PC-based NxtJLib class library. Consult the NxtJLib tutorials and documentation at http://www.aplu.ch/nxtjlib for further information. (Because the Android emulator does not provide support for Bluetooth you cannot run the application in the emulator.)
Download Android app for installation on a smartphone (NXT version)
Download Android app for installation on a smartphone (EV3 version)
(EV3 BrickGate server must be running)
Create QR code to download Android app to your smartphone (NXT version)
Create QR code to download Android app to your smartphone (EV3 version)
(EV3 BrickGate server must be running)
Download sources (NxtPilot.zip)
Download sources (EV3Pilot.zip)
Using JDroidLib you can easily construct a more sophisticated user interface with a steering wheel that is rotated by a finger touch drag. The steering wheel is simply a rotatable Actor instance turned by a touch listener notification.
Download Android app for installation on a smartphone
Create QR code to download Android app to your smartphone.
Download sources (NxtVehicle.zip).
|  LinkUp
 TCPCom
 Simulations