| |
Developing Android Apps On Smartphones
Download ProjectBuilder app for installation on an Android smartphone.
Create QR code to download ProjectBuilder to your smartphone.
You may also download it from Google Play. Use keyword ProjectBuilder.
The dream of computer freaks
It is an old dream of computer enthusiasts to always have a system with a full programming developing environment at hand (editor/compiler/builder/runtime). With mobile devices running Android the dream comes true: The Eclipse IDE and part of the Android SDK have been ported to Android devices. Just download and install a single app on your smartphone or tablet and programming Java is possible wherever you are! At the moment the Android IDE, AIDE, is the product of choice, but other apps with similar features will emerge or can already be found on the Android market.
As we all know, the development of non-trivial (more than "Hello Android") apps require some pain and effort, even for skilled Java programmers. The challenge is not simpler when developing on a small mobile phone because of the limited editing and file manipulation features. But if you have these fancy Android tablets available, you can seamlessly switch to mobile development by using the JDroidLib framework.
We now offer a management tool, called ProjectBuilder, to configure Android projects on mobile devices to be used with the JDroidLib framework. By installing the ProjectBuilder app, you are able to create projects that can be edited, built and run effortlessly even on cheap Android smartphones. Moreover ProjectBuilder can unpack Java sources with additional sprite images and media resources from a ZIP archive and integrate the files automatically in your Android project. ProjectBuilder is looking automatically for those archives and dispatches the files to the Android project folder. Because AndroidManifest.xml and layout files are created accordingly, the distributed app is built locally on the smartphone in a snap. The JDroidLib library is compiled only once when the project is used the first time which may take a while on narrow-chested smartphones. The following build processes use the precompiled library and last only a few seconds, not much longer than on a full-grown desktop computer.
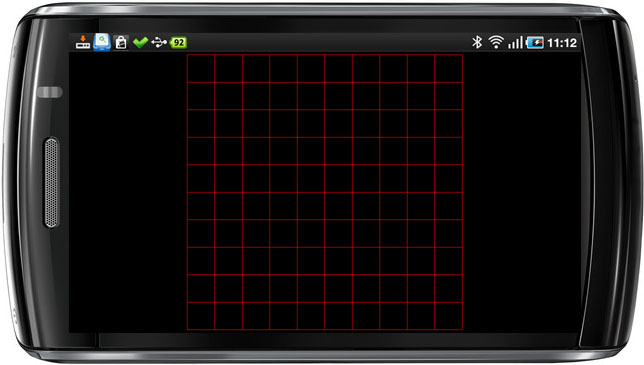
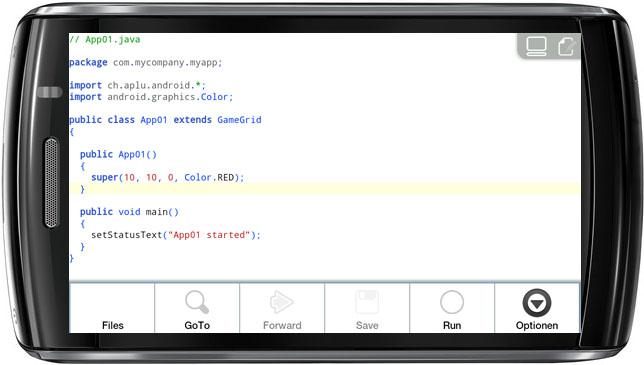
As you see below, a complete JDroidLib-based program displays nicely on a smartphone screen:
Clicking Run will build/install/run the program:
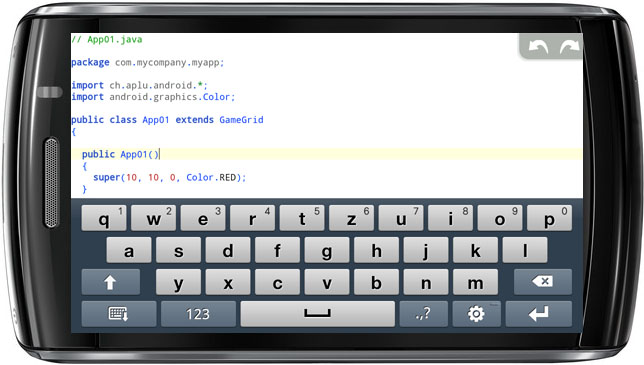
Clicking into the editor window opens a virtual keyboard and let you edit the source:
Enjoy!
All tutorials and example sources on our JDroidLib website can be downloaded as zip archive.
An Online Learning Platform focusing on Java programming for Android smartphones has been developed at University of Bern, Institute of Teacher Training. The sources/resources of all apps can be downloaded and dispatched using ProjectBuilder. (The site is actually in German, English will be available soon). Consult the website http://www.jdroid.ch.
Introductory exercises
Following the principle of Learning by Doing, we recommend to work through some exercises.
First exercise:
-
Download AIDE app from the Android market and install it.
-
Download and install ProjectBuilder app (see top of this page).
-
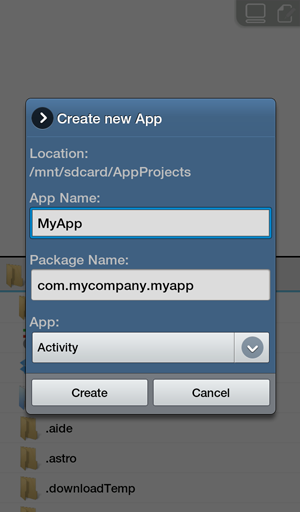
Create an Android project with AIDE. You may adopt the default project settings:
Press the HOME button to quit (but not terminate) AIDE.
-
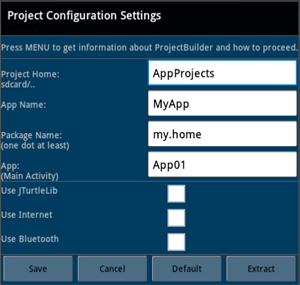
Start the ProjectBuilder app and select default settings.
The defaults are adapted to the AIDE defaults. Package Name and the App (Main Activity) may differ, because ProjectBuilder adapts them to your choice. (Remember that with Android, apps are identified by the package name. To avoid conflicts between different apps, use a different package name).
-
Press Save and AIDE project will be configured using a default source template.
-
Press HOME to quit (but not terminate) ProjectBuilder and resume AIDE. Press the MENU button and select Run. The project is built and you run through the installation process. The app starts and shows a red grid with 10x10 cells.
-
You may study the source by pressing MENU | Files and then open the file App01.java found in the folder AppProjects/MyApp/src/<package subfolder tree>, here in AppProjects/MyApp/src/com/mycompany/myapp. The file Activity.java is not used and may be safely deleted with a long press on the file name.
- If you rebuild the app by pressing Run, the app is now built in much shorter time, because the precompiled library is used.
Second exercise:
-
Go back to the ProjectBuilder and select another package name e.g. de.bonn, also change the App option, e.g. Beta. Press Save and rebuild/run the project with AIDE. The same grid is shown.
-
In AIDE select MENU | Files and browse to the source file Beta.java in the folder AppProjects/MyApp/src/de/bonn. Open it and change the expression Color.RED to Color.GREEN.
-
Press Run again. A green grid is shown.
-
Perform a long press on a file in the file list and a submenu to select file operations is shown. Perform a long press in the editor window and another interesting menu is shown. Try some of these options, e.g. the Format Code option under Code.
-
Browse to the folder bin with the AIDE file browser or any other Android file browser (e.g. File Expert), where you find MyApp.apk ready for distribution on any other Android device. Play with other options found in AIDEs Option menu.
Third exercise:
-
Start your Web browser (Opera mobile is a good choice) and browse the URL http://www.aplu.ch/android. By clicking the link "Android Project Builder" found at the right border, you will end up on this page.
-
Touch Four.zip and the packed source code with sprite images for the game Four-In-A-Row is downloaded to the SD card. (You may check with any Android file browser that Four.zip is in the folder sdcard/download. If you open the archive you see that the it contains a folder src with a package subdirectory structure and Four.java as main activity as well as other Java source files and the folder sprites with some sprite image files).
-
Open ProjectBuilder and select a new package name, e.g. my.game. It is mandatory to select "Four" in the App field, because the name identifies the downloaded zip archive. When you press Save you are asked if you want to dispatch the downloaded archive. Press Yes and the files will be copied to the AIDE project.
-
Open AIDE and press Run. After building and installing, the app starts successfully and you are ready to play (and hopefully win).
-
In AIDE select MENU | Files and browse the sdcard/AppProjects/MyApp folder, where you find the package folder substructure and the source files in src/my/game. Open Four.java and change the color in getBg().clear(Color.WHITE) to Color.GREEN. Press Run again and you will see that the background color has changed to green.
-
You may display and study AndroidManifest.xml in the project root and have a look at the folder res/drawable which contains the sprite images.
-
If the checkboxes Internet or Bluetooth are selected, the required
permission entries are added in the Android manifest file. Check the Internet button and press Save. Answer No to the "Dispatch Four.zip?" question. ProjectBuilder asks you now, if you want to keep your previously edited source file. If you answer Keep, the background remains green, otherwise it becomes white again, because the file is overwritten by the original from .jdroid.src. Open AndroidManifest.xml to see the added Internet permission entry.
-
Delete the folders sdcard/download and sdcard/.jdroid.src. In ProjectBuilder remove the Internet permission. When you press Save now, no warning dialogs are displayed anymore. You may now stay with AIDE and work out your game project, perhaps by improving the program's winning strategy.
If something goes wrong, delete the .jdroid.src, .jdroid.libs, .jdroid.sprites, and .jdroid.media folders
and start with a new project.
A look under the hood
1. SD card folders:
The following subfolders of /mnt/sdcard are reserved for ProjectBuilder:
| Folder |
Content |
| .jdroid.tmp |
Temporary files (only for internal use) |
| jdroid-src |
source files (flat, no package subfolder structure) |
| jdroid-libs |
one or more jar files (flat) |
| jdroid-sprites |
sprite files (flat) |
| jdroid-media |
media files (flat)
|
.
2. Folder transfer operations:
When the Save button is hit, the files are transferred to the following project folders:
| Source |
Target |
| jroid-src |
<projecthome>/src/packagesubfolder/... |
| jdroid-libs |
<projecthome>/libs |
| jdroid-sprites |
<projecthome>/res/drawable |
| jdroid-media |
<projecthome>/res/raw |
Files from the jdroid-libs, jroid-sprites, jdroid-media folders are transferred to the target without any overwrite protection. Special care is taken not to overwrite source files in the project after they are modified by the user. If a file with the same name exists in the target folder and
the file date of the target file differs from the source file,
a file overwrite warning dialog is displayed with Keep and Replace option.
If Keep is hit, no files are transferred, if Replace is hit, all files from jdroid-src are transferred and target files with the same file name are overwritten.
The package statement in all source files is automatically modified to the selected package name. ProjectBuilder contains the library files JDroidLib.jar and JTurtleLib.jar. They are copied into <projecthome>/libs.
When the Extract button is clicked, all files found in the current project
source directory are copied into the jdroid-src folder. By changing the package
name and clicking the Save button, the sources can be reused in the new package
subdirectory (the package statement is adapted automatically). This allows an incremental development process by keeping older versions.
3. Creating a template source:
After the transfer operation, a main activity source file <app>.java must exist in <projecthome>/src/packagesubfolder. Otherwise the app would compile/install, but crashes when started. To avoid this failure, ProjectBuilder checks if the file exists. If not, the file is created with a simple template content based on the Use JTurtleLib check box. The template source is also useful if you start to develop an app from scratch.
4. Dispatching ZIP downloads:
Before executing the transfer process, ProjectBuilder checks if a zip archive starting with <app> can be found in the cdcard/download folder. Is this the case a dialog is shown that asks if you want to dispatch the zip archive. If you answer YES, the following operations happen:
- All files/subdirectories in the following folders are deleted:
.jdroid.tmp,
jdroid-src,
jdroid-libs, jdroid-sprites,
jdroid-media
(we want a clean distribution)
- The archive file starting with <app> with the most recent creation date*) is transferred to .jdroid.tmp and unpacked there
- The unpacked files are transferred as follows:
| Source |
Target |
| src and any subfolders |
jdroid-src |
| libs |
jdroid-libs |
| sprites |
jdroid-sprites |
| media |
jdroid-media |
- The folder transfer operation (as stated in 2.) starts.
Files in folder cdcard/download remain unchanged. They must be manually cleaned up.
*) If the same zip archive is downloaded more than once, the browser normally appends a version number to the file name.
5. ProjectBuilder options
Options are selected by check boxes. Their implications are as follows:
| Option |
Implication |
| Use JTurtleLib |
Use appropriate source template and APK logo |
| Use Internet |
Include appropriate Android application permissions in AndroidManifest.xml |
| Use Bluetooth |
Include appropriate Android application permissions in AndroidManifest.xml
|
| |
 LinkUp
 TCPCom
 Simulations