Aegidius
 Plüss   Aplulogo
     
 www.aplu.ch      Print Text 
© 2021, V10.4
 
  JGameGrid


The source code of all examples is included in the JDroidLib distribution.


Using Android's Built-In Sensors
The Smartphone/Tablet as Measuring Instrument

1 Enumeration of Installed Sensors

The class GameGrid provides the method enumerateSensors() to find out which sensors (instances of the class android.hardware.Sensor) are available. To list the specifications of all sensor, enumerateSensorSpecs() may be used as shown in the following example:

package ch.aplu.sensor.list;

import
 ch.aplu.android.*;
import
 java.util.ArrayList;

public
 class SensorList extends GameGrid
{
  public
 void main()
  {
    GGConsole c =
 GGConsole.init();
    c.println("List of all available sensors:"
);
    c.println(""
);
    ArrayList
<String> sensorSpecs = enumerateSensorSpecs();
    for
 (String s : sensorSpecs)
      c.println(s +
 "\n");
  }
}

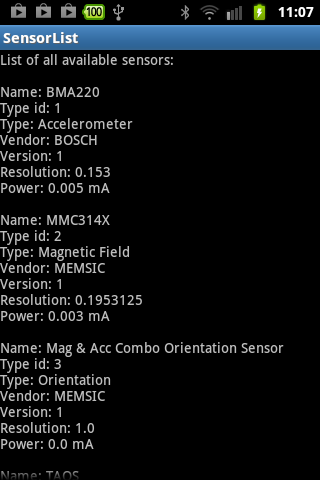
Keep in mind that even if a sensor is part of the installed sensors there is no guarantee that sensor data can be retrieved by an Android app.

Download SensorList app for installation on a smartphone

Create QR code to download Android app to your smartphone.

Download sources (SensorList.zip).

sensorlist


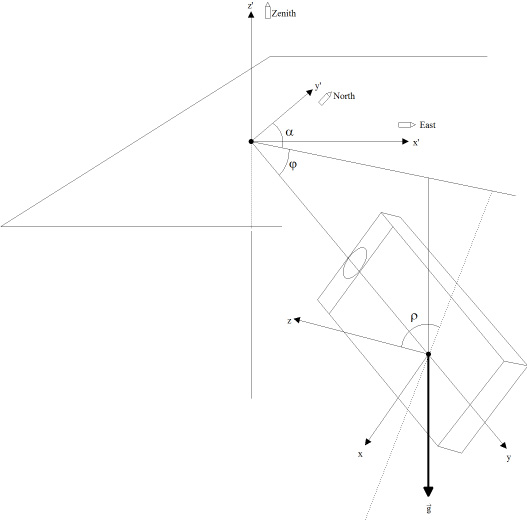
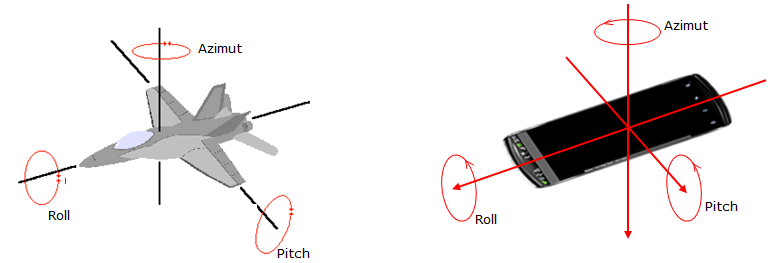
2 World and Device Coordinate Systems

To describe the current orientation, we first define a cartesian laboratory coordinate system, also called world coordinate system, because its coordinate axes (x', y', z') are defined with respect to the earth. Imagine a tangential surface at the current location. The z'-axes points to the zenith, the y'-axis to north (tangent to the longitude circle) and the x'-axes to east (tangent to the lattitude circle). Now we fix a second cartesian coordinate system, called the device coordinate system, with the smartphone/tablet. Its origin is used to describe the current location (we put it in the center of the screen). The device coordinate axes (x, y, z) are defined as follows: z is normal to the screen (positive in upward direction), the x- and y-axes lay in the screen surface, where y is parallel to the larger screen side (positive to the front) and x is parallel to the smaller screen side (positive to the right). This situation is shown in the following figure. In the following we only consider the rotational orientation, so the translation of the origins are of no importance.

  Sensor
 
Device (x, y, z) and World (x',y',z') coordinate system

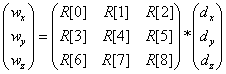
For tablets the y-axes is parallel to the smaller side and the x-axes parallel to the larger side. As the name suggests the device coordinate system is fixed with the device and independent of the current orientation of the application. To take into account the current application orientation (portrait, landscape, reverse portrait, reverse landscape) x and y coordinates must be exchanged as appropriate.

The world coordinate system is obviously a three-dimensional rotated device coordinate system and it is well-known from mathematics (see en.wikipedia.org/wiki/Rotation_matrix) that the coordinates (dx, dy, dz) of some arbitrary point P is transformed to the world coordinates (wx, wy, wz) by a matrix multiplication

 
rot
 
Transformation from device to world coordinates

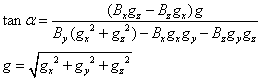
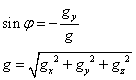
The rotation matrix R has a special property: The inverse matrix is equal to the transpose matrix (R is an orthogonal matrix). So it is easy to reverse the transformation from world to device coordinates.

Now the hardware sensors come into play. If we place two sensors in the mobile phone, an acceleration sensor that measures the current vector of the gravitation acceleration g (vertical) and a magnetic field sensor that measures the current direction of the earth magnetic field B (to north with some inclination), the rotation matrix can be calculated from the measured data. Android's SensorManager class provides the static method getRotationMatrix() that takes the current acceleration and magnetic field vectors and returns the rotation (and inclination) matrix.

The current device rotation is characterized by three angles (also called Euler angles). In the context of mobile devices the three angles are called azimuth (alpha), pitch (phi) and roll (rho) and are defined as seen in the figure above. They can be calculated from the measured gravitational and magnetic field as follows:

 
azimuth
pitch
roll
 
Azimuth
Pitch
Roll

These formulas are implemented in the class GGSensor as getAzimuthCalc(), getPitchCalc() and getRollCalc(). Azimuth, pitch and roll may also be retrieved from the rotation matrix with SensorManager.getOrientation().

Azimuth, pitch and roll correspond to the angles used for airplane/rocket orientation.

  airplane
   

Sensor values are normally retrieved by applying the event model: The sensor is polled internally using a polling time interval determined by the system that can be modified by a constructor parameter. Whenever the new value is different from the previous one, an event is triggered that invokes the callback method sensorChanged(float[] values, int sensorType) where the new value can be retrieved from the values[] parameter.

In the following example we measure the gravitational acceleration and the magnetic field retrieved from the callback method and determine the rotation matrix. Then we calculate the orientation vector. The main thread displays azimuth, roll and pitch in a application independent coordinate system and also adapted to the current application window orientation.

package ch.aplu.sensor.event;

import
 android.hardware.*;
import
 ch.aplu.android.*;
import
 android.graphics.Typeface;

public
 class SensorEvent extends GameGrid
  
implements GGSensorListener
{
  
private float[] R = new float[9];  // Rotation matrix
  
private float[] I = new float[9];  // Inclination matrix
  
private float[] acc = new float[3];
  
private float[] mag = new float[3];
  
private float[] orientation = new float[3];
  
private final int nbLines = 6;
  
private GGTextField[] lines = new GGTextField[nbLines];
  
private GGSensor accelerometer;
  
private GGSensor magnetometer;

  
public SensorEvent()
  
{
    
super(WHITE);
  
}

  
public void main()
  
{
    
setWakeLockEnabled(true);
    
initDisplay();

    accelerometer 
= new GGSensor(this, Sensor.TYPE_ACCELEROMETER, 
      SensorManager.SENSOR_DELAY_FASTEST
);
    accelerometer.
addSensorListener(this);
    accelerometer.
setLowPassFilter(10, 5);

    magnetometer 
= new GGSensor(this, Sensor.TYPE_MAGNETIC_FIELD, 
      SensorManager.SENSOR_DELAY_FASTEST
);
    magnetometer.
addSensorListener(this);
    accelerometer.
setLowPassFilter(10, 5);

    
while (true)
    
{
      
synchronized (orientation)
      
{
        
double azimuth = (360 + Math.toDegrees(orientation[0])) % 360;
        
double pitch = Math.toDegrees(orientation[1]);
        
double roll = Math.toDegrees(orientation[2]);
        
showValue(0, "azimuth", azimuth, "deg");
        
showValue(1, "pitch", pitch, "deg");
        
showValue(2, "roll", roll, "deg");
        
float[] adapted =
          GGSensor.
toDeviceRotation(this, orientation, Sensor.TYPE_ORIENTATION);

        
double _azimuth = (360 + Math.toDegrees(adapted[0])) % 360;
        
double _pitch = Math.toDegrees(adapted[1]);
        
double _roll = Math.toDegrees(adapted[2]);
        
showValue(3, "*azimuth", _azimuth, "deg");
        
showValue(4, "*pitch", _pitch, "deg");
        
showValue(5, "*roll", _roll, "deg");
      
}
      
refresh();
      
delay(50);
    
}
  
}

  
public void sensorChanged(float[] values, int sensorType)
  
{
    
if (sensorType == Sensor.TYPE_ACCELEROMETER)
    
{
      
for (int i = 0; i < 3; i++)
        acc
[i] = values[i];
    
}

    
if (sensorType == Sensor.TYPE_MAGNETIC_FIELD)
    
{
      
for (int i = 0; i < 3; i++)
        mag
[i] = values[i];
    
}
    
boolean success =
      SensorManager.
getRotationMatrix(R, I, acc, mag);
    
if (!success)
      
return;

    
synchronized (orientation)
    
{
      SensorManager.
getOrientation(R, orientation);
    
}
  
}

  
private void initDisplay()
  
{
    
int dist = getNbVertCells() / (nbLines + 1);
    
for (int i = 0; i < nbLines; i++)
    
{
      lines
[i] =
        
new GGTextField(new Location(10, (i + 1) * dist), false);
      lines
[i].setFontSize(getNbHorzCells() / 15);
      lines
[i].setTypeface(Typeface.MONOSPACE);
      lines
[i].show();
    
}
  
}

  
private void showValue(int line, String text, double value, String unit)
  
{
    lines
[line].setText(String.format(text + " = % 5.1f " + unit, value));
  
}
}

We force the display to remain visible by calling setWakeLockEnabled(true). Start the program with different screen orientations to understand the adapted values.

Download SensorEvent app for installation on a smartphone

Create QR code to download Android app to your smartphone.

Download sources (SensorEvent.zip).

sensorevent


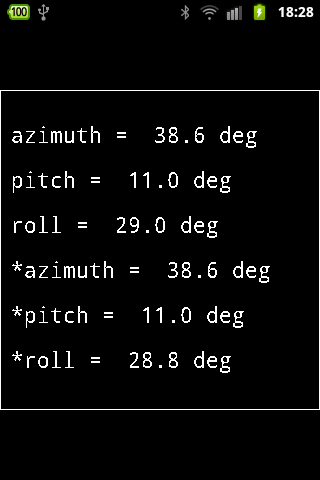
Some smartphones/tablets contains a so called combo sensor that returns acceleration, magnetic field and orientation (azimuth, pitch, roll). The combo sensor is supported by an older (now deprecated) Android API, but may deliver more accurate values for older devices. The class GGComboSensor is based on this API, so consider to use it, if compatibility with older devices is important. The next example shows how to proceed.


package ch.aplu.sensor.orientation;

import
 android.graphics.Typeface;
import
 ch.aplu.android.*;

public
 class SensorOrientation extends GameGrid
{
  
private final int nbLines = 8;
  
private GGTextField[] lines = new GGTextField[nbLines];

  
public SensorOrientation()
  
{
    
super(WHITE);
  
}

  
public void main()
  
{
    
setWakeLockEnabled(true);
    
initDisplay();
    
showLegend1("*: Rot adapted");
    
showLegend2("Rot: " + getRotation());
    GGComboSensor comboSensor 
= GGComboSensor.init(this);
    
while (true)
    
{
      
float[] values = comboSensor.getOrientation(1);
      
showValue(0, "azimuth", values[0], "deg");
      
showValue(1, "pitch", values[1], "deg");
      
showValue(2, "roll", values[2], "deg");
      
showValue(3, "*azimuth", values[3], "deg");
      
showValue(4, "*pitch", values[4], "deg");
      
showValue(5, "*roll", values[5], "deg");
      
refresh();
    
}
  
}

 
private void initDisplay()
  
{
    
int dist = getNbVertCells() / (nbLines +1);
    
for (int i = 0; i < nbLines; i++)
    
{
      lines
[i] =
        
new GGTextField(new Location(10, (i + 1) * dist), false);
      lines
[i].setFontSize(getNbHorzCells() / 15);
      lines
[i].setTypeface(Typeface.MONOSPACE);
      lines
[i].show();
    
}
  
}

  
private void showLegend1(String text)
  
{
    lines
[6].setText(text);
  
}

  
private void showLegend2(String text)
  
{
    lines
[7].setText(text);
  
}

  
private void showValue(int line, String text, double value, String unit)
  
{
    lines
[line].setText(String.format(text + " = % 5.1f " + unit, value));
  
}
}

You may compare the values of the two programs on different devices.

Download SensorOrientation app for installation on a smartphone

Create QR code to download Android app to your smartphone.

Download sources (SensorOrientation.zip).


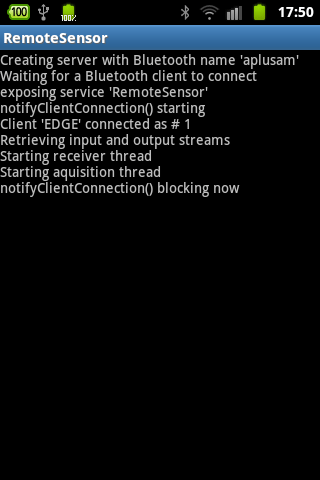
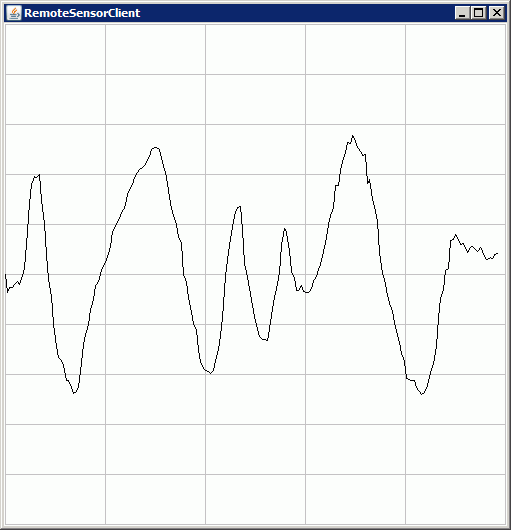
Instead of displaying the values on the mobile device we may transmit them via Bluetooth or Internet to a monitoring station running Java SE. The Android app is running as a Bluetooth server waiting for a client to connect. After connection a data collecting thread measures periodically data from the sensor and transmits time/value pairs via Bluetooth to the client where they are displayed (or processed otherwise). The graphics window is created in no time using the GPanel class from the ch.aplu.util package.

(The sources are part of the JDroidLib distribution.)
sensorlist
remoteclient
RemoteSensor App

RemoteSensorClient (SE)

Execute RemoteSensorClient (for Java SE) locally using WebStart.

Download RemoteSensor app for installation on a smartphone

Create QR code to download Android app to your smartphone.

Download sources (RemoteSensor.zip).